How to Remove Wrinkles from Clothes in Photoshop
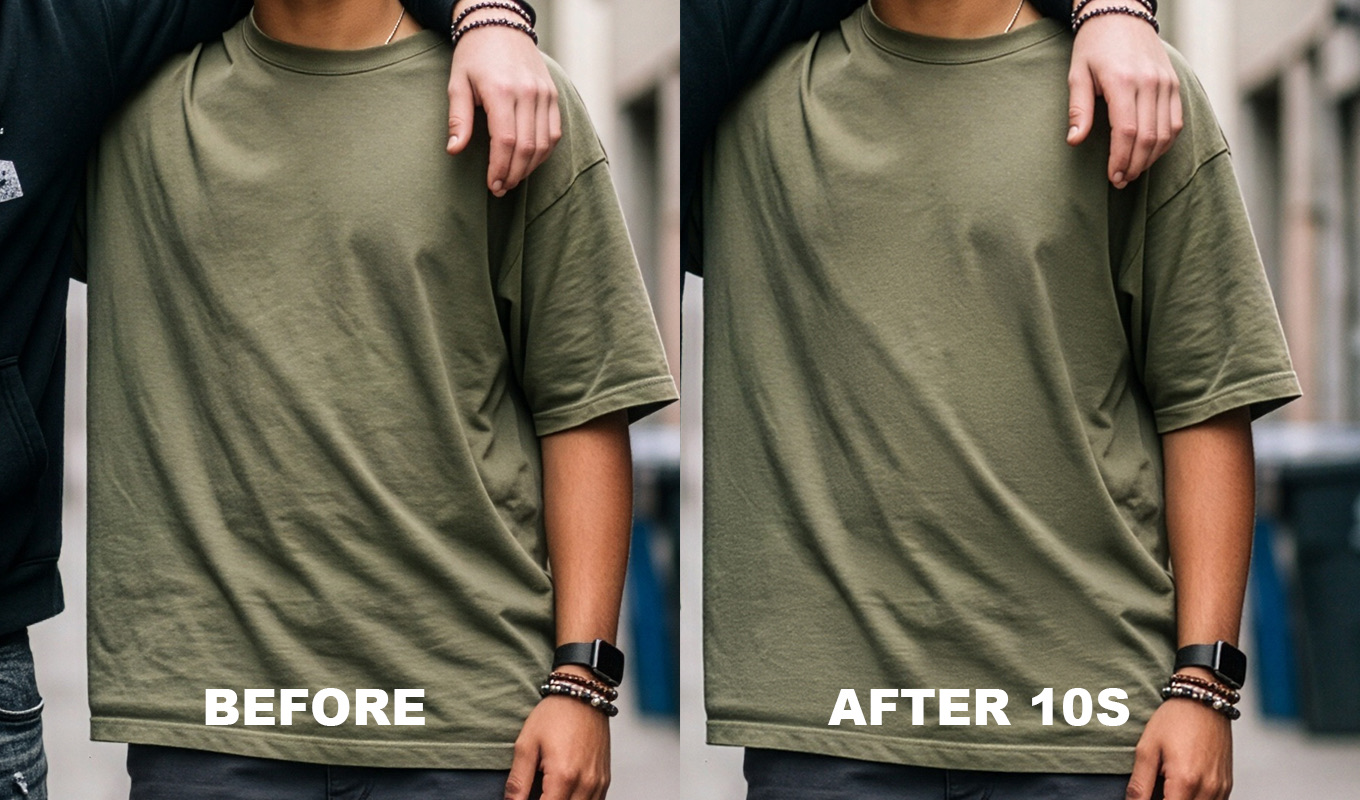
A wrinkled shirt can spoil a portrait that is otherwise right. The light is good, the expression is good, and then you zoom in and see the packaging creases across the chest. Clients forget to steam. Models sit in the car on the way to the shoot. It happens on almost every session I do.
There is no single best way to remove wrinkles from clothes in Photoshop. There are four methods I actually use, and each one fits a different kind of wrinkle. Below is how each one works, when to pick it, and the mistakes that make fabric look fake.
First, Decide What to Keep
Not every fold is a wrinkle. Fabric needs some folds to look like fabric. If you remove all of them, the shirt turns into cardboard and the person looks pasted in.
- Keep: folds that show the body underneath (a bent elbow, fabric draping at the waist), seams, pleats, darts, the drape of a skirt, the roll of a collar.
- Remove: storage creases (the grid lines from a folded new shirt), small ripples, pulls between buttons, bunching where a shirt is tucked in, creases from sitting.
My rule: if the fold tells you how the person is standing, keep it and maybe soften it. If it tells you the shirt spent a week in a drawer, take it out.
Before You Start: Work on a Copy
Press Cmd/Ctrl+J to duplicate the layer, or use Image > Duplicate to work on a copy of the whole file. Do the fabric work at 100% zoom, with a soft brush, and toggle the layer on and off often. Your eyes get used to the edit fast, and the before/after check is what keeps it honest.
Method 1: Spot Healing and Patch for Single Creases
Best for: one or two sharp lines. A crease across a sleeve, one fold line down a T-shirt, a small dent in a jacket.
- Create a new empty layer above the photo.
- Pick the Spot Healing Brush (J). In the options bar set Type to Content-Aware and tick Sample All Layers.
- Make the brush a little wider than the crease. Paint along the crease in short strokes, not one long stroke. Long strokes pull texture from the wrong places.
- For a wider crease, use the Patch Tool on a duplicate layer. Draw around the crease, then drag the selection onto clean fabric with the same light and the same weave direction.
- If the heal leaves a repeated pattern, fix it with the Clone Stamp (S) at 20 to 40% opacity.
Limits: healing copies texture from nearby. On a large wrinkled area it smudges and repeats. On stripes or checks it breaks the lines, so clone along the stripe instead.
Iron Pro: the wrinkle remover for Photoshop
One click builds the setup, then you paint over the wrinkles. Clothes and backdrops smooth out, the fabric keeps its texture, and every slider stays adjustable.
GET IRON PRO →“I used to spend so much time fixing little wrinkles in clothes. Now I can focus on making my photos beautiful instead of worrying about every tiny crease.”
“I'm a photographer, not a dry cleaner! I swear every photoshoot has at least one wrinkled shirt, dress or pair of trousers. This tool will save me in fashion weeks for suuure!”
“Wedding dresses are beautiful, but after hours of walking, sitting, hugging and dancing, they can become a retouching nightmare. This has made my workflow so much easier.”
“I swear clothes always look more wrinkled in photos than they do in real life. A few brush strokes and the clothes look so much better!”
“I used to spend so much time fixing little wrinkles in clothes. Now I can focus on making my photos beautiful instead of worrying about every tiny crease.”
“I'm a photographer, not a dry cleaner! I swear every photoshoot has at least one wrinkled shirt, dress or pair of trousers. This tool will save me in fashion weeks for suuure!”
“Wedding dresses are beautiful, but after hours of walking, sitting, hugging and dancing, they can become a retouching nightmare. This has made my workflow so much easier.”
“I swear clothes always look more wrinkled in photos than they do in real life. A few brush strokes and the clothes look so much better!”
Method 2: Frequency Separation for Fabric
Best for: a whole area of soft wrinkles on plain fabric. A shirt front, a sweater, the back of a jacket.
Why it works: a wrinkle is mostly light and shadow. The weave of the fabric is fine detail sitting on top. Split the photo into those two layers, and you can smooth the light and shadow while the weave stays sharp.
- Duplicate the photo layer twice. Name the lower copy Low and the upper copy High.
- Hide High. On Low, go to Filter > Blur > Gaussian Blur and raise the radius just until the weave disappears. On a 24 megapixel file that is often somewhere around 4 to 10 px. Thick knits need more.
- Select High and go to Image > Apply Image. Layer: Low. For an 8-bit file use Blending Subtract, Scale 2, Offset 128. For a 16-bit file use Blending Add, tick Invert, Scale 2, Offset 0. Set the High layer to Linear Light. The photo should look unchanged.
- On Low, take the Lasso tool with a feather of about 20 px. Select one wrinkled patch, staying inside the garment and away from seams. Run Gaussian Blur again at a much bigger radius until the shadows of the wrinkle melt. Repeat patch by patch.
- If a crease line is still sharp, clone it out on the High layer.
The full fabric walkthrough with settings for different materials is here: frequency separation for clothes. If you know the technique from skin, the logic is the same as frequency separation for skin, only with bigger blur radiuses.
Limits: it is slow on a full outfit. If your selection crosses the edge of the garment, you get a soft halo. Prints can shift and smear.
Method 3: Generative Fill for Small Areas
Best for: a small crumpled spot in a busy place. A twisted cuff, a collar point that folded over, a pocket that bunched up.
- Draw a selection around the spot with the Lasso, with a little margin.
- Click Generative Fill in the Contextual Task Bar. Leave the prompt empty or type something plain like "smooth fabric".
- Press Generate and look through the variations. The result lands on its own layer with a mask, so you can paint parts of it away.
Limits: Generative Fill uses generative credits and an internet connection. It invents new pixels, so on a bigger area it can change the garment: a different weave, a new button, a slightly different color. On large selections it can also look softer than the rest of the photo. Keep selections small and always check at 100%. I compare it with other AI tools in AI clothes wrinkle removers vs Photoshop.
Method 4: Iron Pro Paint-Over
I make Iron Pro, so weigh that. It is a Photoshop plugin from the makers of RetouchLab Skin Pro, using the same engine tuned for fabric. It builds the smoothing and texture layers for you, and then you paint where the wrinkles are. It is not AI: it uses Photoshop filters and layers, runs on your computer and works offline.
- Save first or work on a copy. When you press RUN IRON it flattens the document and converts it to 8-bit if needed.
- Set Blur Radius before you run it. The default of 20 px suits most clothes. Go higher for big folds. Backdrops need 60 to 100.
- Press RUN IRON. It builds a group for Zone 1 with a black mask. Inside: a Color layer (Median blur, the smoothing), a New Texture layer (gray plus noise in Overlay, for fine texture) and an OG Texture layer (High Pass in Linear Light, the original fabric detail).
- Paint white on the mask over the wrinkles. Press X to swap to black and erase. Change brush size with [ and ].
- Adjust live. Smoothing (default 80), New Texture, Fabric Detail, Clarity and Grain all update after you paint.
- Need different settings for another part? Press + NEW ZONE. For example, the shirt at radius 20 and the backdrop at radius 60 in the same photo.
Limits: it softens wrinkles and creases. It does not rebuild missing fabric. It does not fix hard structural folds that give the garment its shape, so keep those or use Clone and Patch. Keep the brush off lace, sheer fabric, heavy prints and logos, because it would blur the pattern. And it works on one photo at a time, not in batches.
Which Method for Which Wrinkle?
| WRINKLE | BEST METHOD | WATCH OUT FOR |
|---|---|---|
| One sharp crease | Spot Healing, Patch | Repeated texture |
| Packaging grid lines on a plain shirt | Frequency separation or Iron Pro | Keep the weave |
| Soft ripples across a whole garment | Frequency separation or Iron Pro | Halos at edges |
| Crumpled cuff, collar point | Generative Fill or Clone Stamp | Changed details |
| Wrinkled backdrop | Median blur on a mask, Iron Pro at a big radius, or Backdrop Pro | Hair edges, banding |
| Lace, prints, logos | Clone Stamp by hand | Broken pattern lines |
| Lightroom only | Remove tool plus negative Texture and Clarity | Only softens |
Mistakes That Make Fabric Look Fake
- Plastic fabric. You smooth until the weave is gone. Cotton should still look like cotton. Keep the detail layer and add a little grain back.
- Removing every fold. A shirt with zero folds looks like a printed picture of a shirt. Leave the folds that follow the body.
- Smeared prints. Blurring across stripes, checks or a logo bends the pattern. Mask around it or clone along it.
- Halos at the edges. If the blur crosses from the shirt into skin or background, you get a soft glow. Keep selections inside the garment.
- Mismatched noise. The fixed area is cleaner than the rest of the photo. Use Filter > Noise > Add Noise at a low amount, or a grain slider, so it matches.
- Judging only at fit to screen. Problems hide at small sizes. Check at 100%, then zoom out and check again.
Guides for Specific Cases
- Collar, placket, sleeves and tucked-in bunching: how to iron a shirt in Photoshop.
- Business portraits and LinkedIn photos: fixing a wrinkled shirt in a headshot.
- Satin, tulle and lace: removing wrinkles from a wedding dress.
- Selling clothes online: wrinkles in clothing product photos.
- No Photoshop? What works and what does not: removing wrinkles from clothes in Lightroom.
- Comparing tools: best wrinkle remover plugins for Photoshop.
Iron Pro: the wrinkle remover for Photoshop
One click builds the setup, then you paint over the wrinkles. Clothes and backdrops smooth out, the fabric keeps its texture, and every slider stays adjustable.
GET IRON PRO →Prevent It on Set
The fastest wrinkle to remove is the one that never reaches the camera. I keep a handheld steamer in my bag and ask clients to bring shirts on a hanger, not folded in a backpack. A clip at the back pulls loose fabric tight for front-facing poses. And between setups I zoom in on the back of the camera, because a crease I can steam out in seconds can take much longer to retouch.
Frequently Asked Questions
How do I remove wrinkles from clothes in Photoshop?
For one sharp crease, use the Spot Healing Brush or Patch Tool on a new layer. For a larger area of soft wrinkles, use frequency separation and smooth only the low frequency layer, so the fabric weave stays. Generative Fill works for small spots. A plugin like Iron Pro builds the layers for you and you paint over the wrinkles.
What is the best tool to remove wrinkles in Photoshop?
It depends on the wrinkle. Spot Healing and Patch are best for single creases, frequency separation is best for big areas of plain fabric, and the Clone Stamp is best for lace, prints and logos where the pattern must stay intact.
Can Generative Fill remove wrinkles from clothes?
Yes, on small areas. Select the spot, click Generative Fill and generate with an empty prompt. On large areas it can change the fabric, the color or details like buttons, and it uses generative credits, so check the result at 100%.
How do you smooth fabric in Photoshop without losing texture?
Separate the light and shadow of the wrinkles from the fine weave with frequency separation, then blur only the light and shadow layer. Add a little noise back at the end so the smoothed area matches the grain of the rest of the photo.
Should I remove all wrinkles from clothes in a portrait?
No. Keep folds that show the body and the pose, like a bent elbow or fabric draping at the waist, plus seams and pleats. Remove storage creases, small ripples, button pulls and bunching. A garment with no folds at all looks fake.