How to Remove Shine from a Face in Photoshop
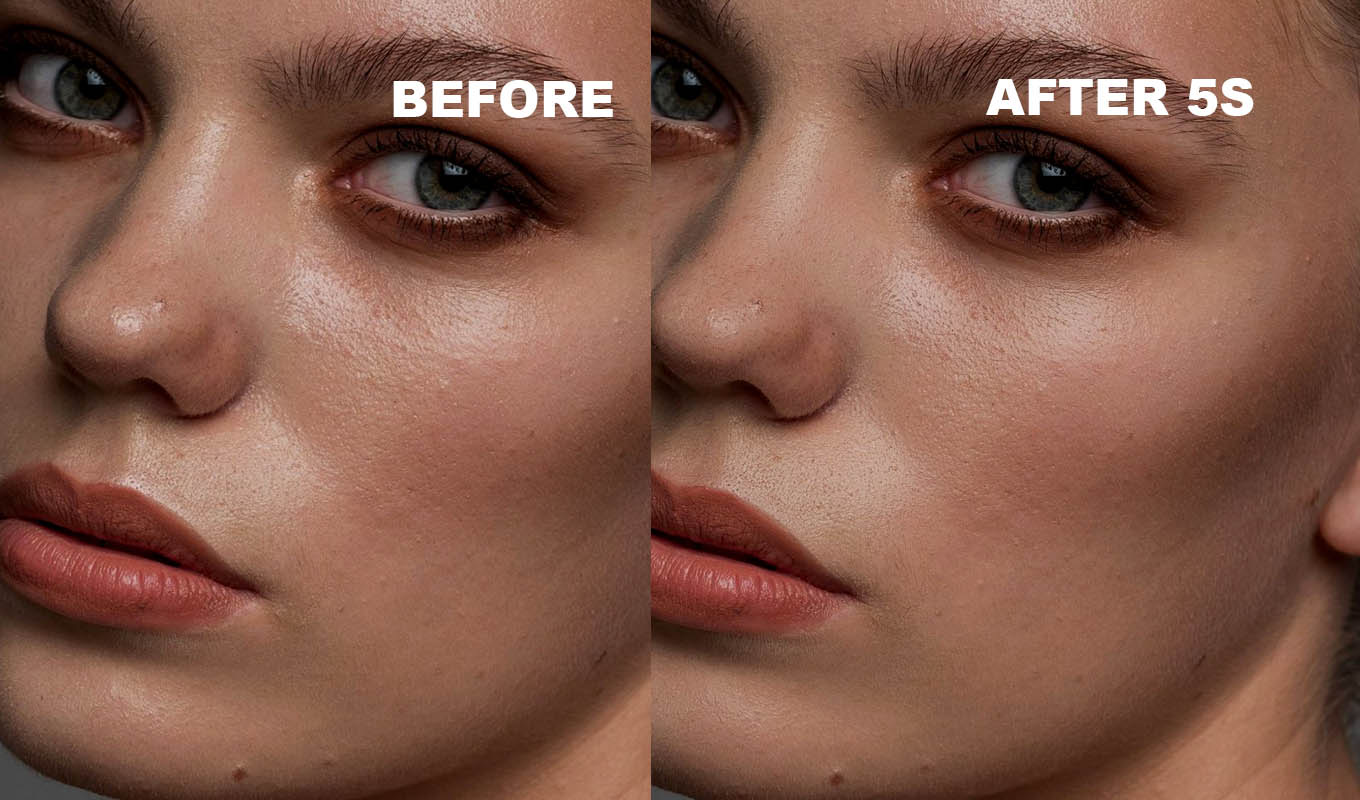
Shine is the first thing clients ask me to fix in a headshot. A bright patch on the forehead or the tip of the nose catches the eye before the expression does. Flash makes it worse, and so does a warm room, a long event or simply oily skin.
The trap is fixing it with tools that also flatten the skin. Here are the methods I use, from the quickest to the most careful, and the one rule that keeps a face looking alive.
Shine vs Highlight
Not every bright spot is a problem. Skin needs a highlight to show shape: the bridge of the nose, the top of the cheekbone, a soft glow on the forehead. Remove all of it and the face turns matte like paper, and looks pasted in.
- Remove: hard, white hot spots with no skin color in them, greasy patches across the forehead and nose, sweat shine, a flash reflection that is bigger than the feature.
- Keep, maybe soften: a small soft highlight on the nose, cheekbones and brow bone that follows the shape of the face.
My rule: reduce shine to a highlight, never to nothing.
Method 1: Paint in Darken Mode
This is the method I use most. It is quick, it keeps texture, and it is easy to control.
- Create a new empty layer above the photo and set its blend mode to Darken.
- Pick the Brush tool (B), soft, with opacity around 10 to 20%.
- Hold Alt/Option and click on clean skin right next to the shine, to sample its color.
- Paint over the shine in a few light passes. Sample again often, because skin color changes across the face.
- Lower the layer opacity if the result looks too matte.
Why it works: in Darken mode your color only shows where the photo is brighter than it. The shiny spot gets darker, the skin around it, which is already darker, stays untouched. The pores in the shine stay visible because you are painting at low opacity.
Matte Pro: remove shine from skin in Photoshop
One click builds the setup, then you paint over the shiny skin. Only the spots brighter than the skin around them are toned down, and the pores stay.
GET MATTE PRO →“I love natural skin retouching, and this makes it so easy to get rid of unwanted shine without losing that beautiful skin texture. Exactly what I've been looking for!”
“I used to spend so much time fixing skin manually. Now I just grab the brush and go over the areas that need it. Such a small thing, but it makes my editing so much easier!”
“Summer weddings are beautiful until you open the portraits and realise everyone is glowing a little TOO much. This has saved me so much time fixing shiny foreheads and cheeks.”
“One of those little Photoshop tools that makes a surprisingly big difference. I used to spend time manually reducing shiny spots with different techniques. Now I can do it in seconds.”
“I love natural skin retouching, and this makes it so easy to get rid of unwanted shine without losing that beautiful skin texture. Exactly what I've been looking for!”
“I used to spend so much time fixing skin manually. Now I just grab the brush and go over the areas that need it. Such a small thing, but it makes my editing so much easier!”
“Summer weddings are beautiful until you open the portraits and realise everyone is glowing a little TOO much. This has saved me so much time fixing shiny foreheads and cheeks.”
“One of those little Photoshop tools that makes a surprisingly big difference. I used to spend time manually reducing shiny spots with different techniques. Now I can do it in seconds.”
Method 2: Clone Stamp in Darken
When the shine has washed out the texture, painting color is not enough. Bring real skin in from next to it.
- Create a new empty layer. Pick the Clone Stamp (S), set Mode to Darken, opacity around 20 to 30%, and Sample to Current & Below.
- Alt/Option click on nearby skin with similar tone and texture.
- Paint over the shine in short strokes. Move the source often so you do not repeat the same pores.
The Healing Brush also has a Darken mode and blends the result into its surroundings. On small hot spots it is very quick. On a large shiny area it can smear, so I switch to the Clone Stamp there.
Method 3: Frequency Separation
For beauty work with a lot of shine, split the photo into a color layer and a texture layer. Then fix the shine on the color layer with a soft brush or a little blur, and the pores on the texture layer stay exactly as they were. It is the most control and the slowest. The full setup is in frequency separation in Photoshop.
What to Avoid
- Content-Aware Fill on shine: it replaces skin and often removes pores or brings in texture from the wrong area.
- Painting in Normal mode: it lays a flat color over the skin and the pores disappear.
- Global Curves or Highlights: they darken every highlight in the photo, including the eyes and the background.
Watch: RetouchLab Matte Pro in Photoshop
Real screen recording, 34 seconds. Open on YouTube
Where Matte Pro Fits
I make Matte Pro, so weigh that. It is a Photoshop plugin built on Method 1. It creates a smoothed color layer in Darken mode with a black mask, plus layers that bring the skin detail back. You press REMOVE SHINE and paint over the shiny areas. Only the spots brighter than the skin around them are toned down.
- Shine Size (set before the button, 5 to 100 px) matches small hot spots or big shiny areas, and it grows with the size of the photo.
- Matte Amount sets how much of the shine goes. Leave some.
- Skin Detail and New Texture keep the pores.
It is not AI and runs offline. Retouch4me Mattifier is an AI plugin for the same job if you prefer that approach. Limits: keep the brush away from the eyes and lips, because their highlights are what make them look wet and alive. Fully blown out spots with no detail left still need the Clone Stamp for texture.
Prevent Shine on Set
- Keep blotting papers and translucent powder in your bag for headshots and events.
- Use a bigger, softer light source. A small hard light makes small hard hot spots.
- Move the light a little to the side. Shine is a reflection, so a small change of angle moves it off the forehead.
Sweat is a slightly different job, with drops and wet patches, see how to remove sweat in Photoshop. If you edit in Lightroom, see removing shine in Lightroom.
Matte Pro: remove shine from skin in Photoshop
One click builds the setup, then you paint over the shiny skin. Only the spots brighter than the skin around them are toned down, and the pores stay.
GET MATTE PRO →Frequently Asked Questions
How do I remove shine from a face in Photoshop?
Create an empty layer in Darken blend mode, sample skin color next to the shine with Alt/Option, and paint over the shine with a soft brush at 10 to 20% opacity. Darken mode only affects pixels brighter than your color, so the rest of the skin stays.
How do I remove oily skin in Photoshop without losing texture?
Work at low opacity in Darken mode, or use the Clone Stamp in Darken mode to bring in real skin texture from nearby. Avoid Content-Aware Fill and Normal mode painting, which flatten the pores.
Should I remove all the shine from a face?
No. Keep a soft highlight on the nose, cheekbones and brow bone. It shows the shape of the face. Remove only hot spots and greasy patches.
Why use Darken blend mode for shine?
Darken shows your color only where the photo is brighter than it. The shiny spots get darker and the skin around them, which is already darker, is not changed.