How to Remove Sweat in Photoshop
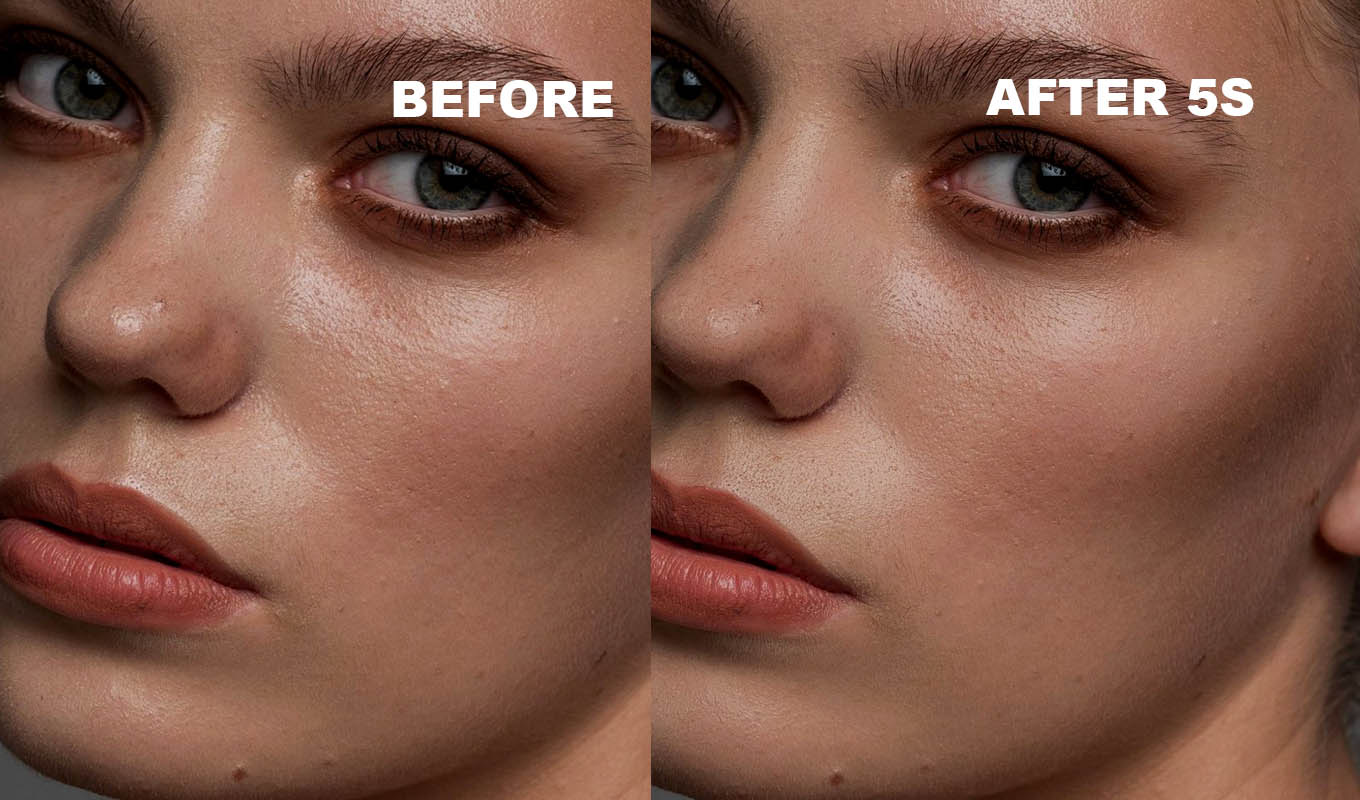
Weddings in July, sports, dance, a long event under hot lights: sweat shows up in a lot of my photos. In the moment nobody minds. In the gallery it is the first thing the client sees. The good news is that sweat breaks down into three small problems, and each one has a simple fix.
1. Sweat Shine on the Face
Sweat shine looks like oily shine, only wetter and often spread across the forehead, temples and upper lip. The fix is the same as for any shiny skin.
- Create a new empty layer and set its blend mode to Darken.
- Take a soft Brush (B) at 10 to 20% opacity.
- Alt/Option click on dry skin right next to the shine to sample its color.
- Paint over the shine in light passes. Sample again as you move across the face.
Darken mode only changes pixels that are brighter than your color, so the shine drops and the rest of the skin stays as it was, pores included. Keep a soft highlight on the nose and cheekbones so the face does not go flat. The full method, with the Clone Stamp and frequency separation options, is in how to remove shine from a face in Photoshop.
2. Sweat Drops
Drops on the forehead, a bead running down the temple, wet skin on the neck. These are small and sharp, so treat them like blemishes.
- Duplicate the layer or work on an empty layer with Sample All Layers ticked.
- Pick the Spot Healing Brush (J), Type Content-Aware, brush just bigger than the drop.
- Click once per drop. For a running bead, paint along it in short strokes.
- Check each one. If the heal pulled in hair or an edge, undo and use the Healing Brush with a source you pick yourself.
A drop usually has a bright highlight and a darker edge. Make sure both are gone, or a faint ring stays behind. For many small drops, the steps in removing blemishes fast apply the same way.
Matte Pro: remove shine from skin in Photoshop
One click builds the setup, then you paint over the shiny skin. Only the spots brighter than the skin around them are toned down, and the pores stay.
GET MATTE PRO →“I love natural skin retouching, and this makes it so easy to get rid of unwanted shine without losing that beautiful skin texture. Exactly what I've been looking for!”
“I used to spend so much time fixing skin manually. Now I just grab the brush and go over the areas that need it. Such a small thing, but it makes my editing so much easier!”
“Summer weddings are beautiful until you open the portraits and realise everyone is glowing a little TOO much. This has saved me so much time fixing shiny foreheads and cheeks.”
“One of those little Photoshop tools that makes a surprisingly big difference. I used to spend time manually reducing shiny spots with different techniques. Now I can do it in seconds.”
“I love natural skin retouching, and this makes it so easy to get rid of unwanted shine without losing that beautiful skin texture. Exactly what I've been looking for!”
“I used to spend so much time fixing skin manually. Now I just grab the brush and go over the areas that need it. Such a small thing, but it makes my editing so much easier!”
“Summer weddings are beautiful until you open the portraits and realise everyone is glowing a little TOO much. This has saved me so much time fixing shiny foreheads and cheeks.”
“One of those little Photoshop tools that makes a surprisingly big difference. I used to spend time manually reducing shiny spots with different techniques. Now I can do it in seconds.”
3. Sweat Stains on Clothes
Damp patches under the arms, on the back or across the chest show as darker, sometimes shinier fabric. The weave is still there, it is mostly a tone and color difference.
- Make a loose selection around the damp patch with the Lasso, feather it by 10 to 20 px.
- Add a Curves adjustment layer. The selection becomes its mask.
- Raise the curve until the patch matches the brightness of the dry fabric next to it. If the color is off too, use the individual color channels in Curves, or add a Hue/Saturation layer with the same mask.
- Paint on the mask with a soft brush to fine tune the edge.
- If a hard edge of the stain still shows, clone it out on a new layer with the Clone Stamp at low opacity.
On light fabric this is quick. On dark fabric, damp areas can also look shinier. Lower the shine with the same Darken mode painting as for skin, sampling dry fabric. If the shirt is also wrinkled, see how to iron a shirt in Photoshop.
Wet Hair
Sweaty hair stuck to the forehead is the hardest part and the one I usually leave in action and sport photos. For portraits, clone strands away carefully at low opacity, or accept a little. Wet hair is part of a sport photo telling the truth.
Where Matte Pro Fits
I make Matte Pro, so weigh that. It speeds up the first part: the shine. It builds a smoothed color layer in Darken mode with a black mask and layers that bring the skin detail back. You press REMOVE SHINE and paint over the shiny areas, then set how much to remove with Matte Amount. It is not AI and runs offline. It does not remove drops or stains on clothes. For those, the healing and Curves steps above are still the way.
Quick Guide
| PROBLEM | TOOL |
|---|---|
| Sweat shine on skin | Brush in Darken mode, or Matte Pro |
| Sweat drops | Spot Healing Brush (J) |
| Damp patch on clothes | Masked Curves, then Clone Stamp for the edge |
| Wet hair on the face | Clone at low opacity, or leave it |
On set, a towel, blotting papers and a fan between shots save a lot of this work. If you edit in Lightroom, shine can be softened there too, see removing shine in Lightroom.
Matte Pro: remove shine from skin in Photoshop
One click builds the setup, then you paint over the shiny skin. Only the spots brighter than the skin around them are toned down, and the pores stay.
GET MATTE PRO →Frequently Asked Questions
How do I remove sweat from a face in Photoshop?
For shine, paint on an empty Darken mode layer with skin color sampled nearby at low opacity. For drops, use the Spot Healing Brush one drop at a time. Keep a soft highlight so the face does not look flat.
How do I remove sweat stains from clothes in Photoshop?
Select the damp patch with a feathered Lasso, add a Curves adjustment layer and raise it until the patch matches the dry fabric. Fix color with Hue/Saturation if needed and clone any hard edge.
What is the fastest way to remove sweat shine?
A Darken mode layer with a soft brush at 10 to 20% opacity. Matte Pro, a Photoshop plugin, sets this up in one click so you only paint over the shine.
Should I remove sweat from sports photos?
Usually only shine and distracting drops. Sweat and wet hair are part of an action photo, and removing all of it can make the photo look staged.