How to Iron a Shirt in Photoshop
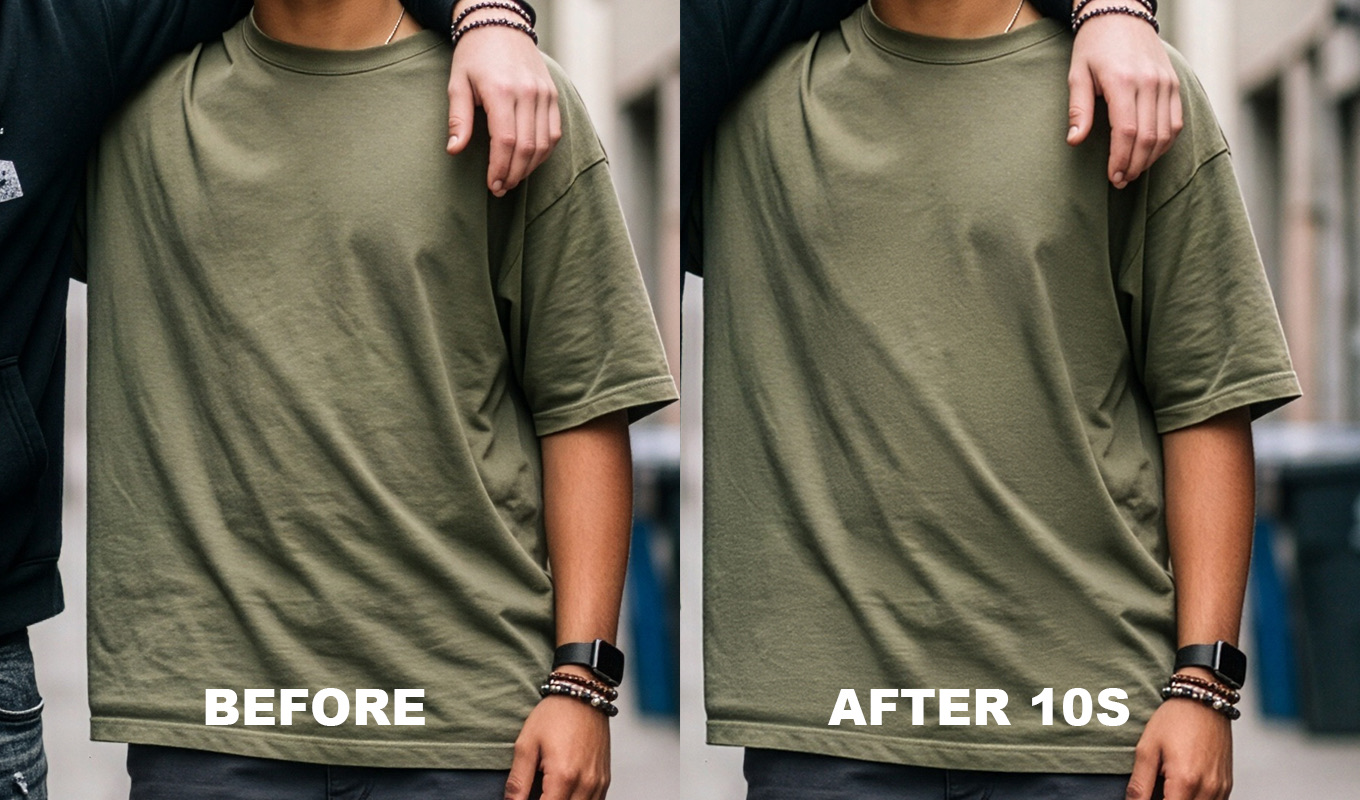
The shirt is the garment I retouch most. Business portraits, headshots, family sessions: there is almost always a button-up shirt, and it almost always has creases. Shirts are also tricky, because they have structure. A collar, a placket, seams and cuffs are supposed to have edges. "Ironing" a shirt in Photoshop means removing the wrinkles and keeping that structure.
This is the shirt-specific version. For the four general methods compared, see the main guide on how to remove wrinkles from clothes in Photoshop.
Read the Shirt First
Before touching a tool, look at the shirt part by part and decide what goes and what stays.
| PART | REMOVE | KEEP |
|---|---|---|
| Collar | Ripples on the collar band, a point that curls up | The fold where the collar turns over |
| Placket | Waves along the button strip, pulls at buttons | The straight edge of the placket |
| Chest | Packaging grid lines, small ripples | Soft shading that shows the body |
| Sleeves | Storage creases, twisted fabric | A few folds at a bent elbow |
| Waist | Bunching over the belt | The tuck line itself |
| Seams | Puckering beside the seam | The seam line |
My rule: a fold that follows the pose stays, a fold that follows the packaging goes. Elbow folds follow the arm. Grid lines across the chest follow how the shirt was folded in the shop.
How to Iron a Shirt in Photoshop, Step by Step
Seven steps, in the order I do them. Shape problems come first (collar, placket), then the big smooth areas, then the waist, then a final check. You will not need every step on every shirt.
Step 1: Work on a Copy
Duplicate the layer with Cmd/Ctrl+J and zoom to 100%. Keep the original visible below so you can toggle and compare.
Step 2: Fix the Collar
Collars are small and full of edges, so blur is the wrong tool. Use the Clone Stamp (S) at 30 to 50% opacity on a new layer with Sample set to Current & Below. Clone clean collar fabric over the ripple, following the direction of the collar. If a collar point curls up away from the body, use Filter > Liquify with the Forward Warp tool and a small brush to push it gently back down.
Step 3: Straighten the Placket and Button Pulls
A shirt that is a little tight pulls between the buttons and makes small X-shaped creases that point at each button. These are the most common shirt problem in headshots.
- On a new layer, use the Spot Healing Brush (J), Content-Aware, Sample All Layers. Paint short strokes along each pull line, starting away from the button and stopping before you touch it.
- If the placket edge itself is wavy, use Liquify with Forward Warp at a large brush size and low pressure to straighten it. Keep the Freeze Mask tool on the buttons so they do not bend.
- If the shirt gapes and shows skin between buttons, clone shirt fabric over the gap from just above or below.
Step 4: Smooth the Chest and Back
This is the big area, and packaging creases live here. Use frequency separation: blur a copy (Low) just until the weave disappears, build the detail layer (High) with Image > Apply Image, set it to Linear Light, then blur feathered patches on Low to melt the crease shadows. The detail layer keeps the cotton weave. The full method with fabric settings is in frequency separation for clothes.
Leave a little soft shading across the chest. A perfectly even shirt front looks flat and printed.
Iron Pro: the wrinkle remover for Photoshop
One click builds the setup, then you paint over the wrinkles. Clothes and backdrops smooth out, the fabric keeps its texture, and every slider stays adjustable.
GET IRON PRO →“I used to spend so much time fixing little wrinkles in clothes. Now I can focus on making my photos beautiful instead of worrying about every tiny crease.”
“I'm a photographer, not a dry cleaner! I swear every photoshoot has at least one wrinkled shirt, dress or pair of trousers. This tool will save me in fashion weeks for suuure!”
“Wedding dresses are beautiful, but after hours of walking, sitting, hugging and dancing, they can become a retouching nightmare. This has made my workflow so much easier.”
“I swear clothes always look more wrinkled in photos than they do in real life. A few brush strokes and the clothes look so much better!”
“I used to spend so much time fixing little wrinkles in clothes. Now I can focus on making my photos beautiful instead of worrying about every tiny crease.”
“I'm a photographer, not a dry cleaner! I swear every photoshoot has at least one wrinkled shirt, dress or pair of trousers. This tool will save me in fashion weeks for suuure!”
“Wedding dresses are beautiful, but after hours of walking, sitting, hugging and dancing, they can become a retouching nightmare. This has made my workflow so much easier.”
“I swear clothes always look more wrinkled in photos than they do in real life. A few brush strokes and the clothes look so much better!”
Step 5: Calm the Sleeves
Sleeves wrinkle more than anything else, because arms move. If the arm is bent, keep two or three folds at the elbow and soften the rest. Remove straight storage creases running along the sleeve with the Spot Healing Brush, or the Patch Tool for wider ones. Cuffs that twist can be cloned or, if small, fixed with Generative Fill on a tight selection.
Step 6: Fix Tucked-In Bunching
A tucked shirt puffs out over the belt and makes a lumpy line at the waist. Two parts to this fix:
- The silhouette: Filter > Liquify, Forward Warp, a large brush, and gentle pushes inward on the puffed parts. Freeze the arms and the background edges first, and watch the background for bending.
- The folds inside: soften them on the Low layer of your frequency separation, or with the Patch Tool. Keep the tuck line where the shirt meets the trousers, it is structure.
Step 7: Match the Grain and Check
Smoothed fabric often looks cleaner than the rest of the photo. Add a gray layer in Overlay with Filter > Noise > Add Noise at a low amount if needed. Toggle all your layers off and on once at 100% and once at fit to screen. If the shirt looks pressed but still like cotton, you are done.
The Faster Way: Iron Pro
I make Iron Pro, so weigh that. It covers Step 4 and most of Step 5 in one setup: you set Blur Radius (the default 20 suits shirts), press RUN IRON, and paint white on the mask over the creases. It is not AI, it uses Photoshop filters and layers and runs offline.
- RUN IRON flattens the document and converts to 8-bit if needed, so save a copy first.
- It builds a group for Zone 1 with a Color layer (Median blur), New Texture and OG Texture layers, so the cotton keeps its detail.
- Press X to swap to black and erase if you painted over a seam or a fold you want to keep. Brush size with [ and ].
- Smoothing, New Texture, Fabric Detail, Clarity and Grain change live after painting.
- + NEW ZONE gives a second area its own settings, for example a wrinkled backdrop at a bigger radius.
What it will not do: fix the collar edges, straighten a wavy placket or pull in tucked bunching. Those are shape problems, so Clone Stamp and Liquify stay. Keep the brush off printed shirts, logos and fine checks, or the pattern blurs.
Shirt Fabrics That Need Care
- White shirts: wrinkles show as gray lines. Do not smooth until the shirt goes flat white, or you lose the form. Watch for blown highlights.
- Linen: linen is meant to look a bit creased. Soften the worst creases and leave the character.
- Stripes and checks: blurring bends the lines. Clone along the stripe with the Clone Stamp, matching the line exactly.
- Dark shirts: wrinkles are subtle, but lint and dust show. Clean those with the Spot Healing Brush first.
- Knit polos and T-shirts: they stretch rather than crease. Pulls at the shoulders and chest soften well with frequency separation.
For corporate headshots, where the shirt is the main thing in the frame after the face, see how to fix a wrinkled shirt in a headshot.
Iron Pro: the wrinkle remover for Photoshop
One click builds the setup, then you paint over the wrinkles. Clothes and backdrops smooth out, the fabric keeps its texture, and every slider stays adjustable.
GET IRON PRO →Frequently Asked Questions
How do I remove wrinkles from a shirt in Photoshop?
Work on a duplicate layer. Use the Spot Healing Brush for single creases and button pulls, frequency separation for the chest and back, Clone Stamp for the collar, and Liquify for a wavy placket or bunching at the waist. Add a little noise at the end so the fabric matches the photo.
How do you fix button pulls on a shirt in Photoshop?
On a new layer, use the Spot Healing Brush set to Content-Aware with Sample All Layers, and paint short strokes along each pull line without touching the button. If the shirt gapes, clone fabric over the gap from just above or below.
Which shirt wrinkles should I keep?
Keep folds that follow the pose, like a few folds at a bent elbow, plus the collar fold, seams, the placket edge and the tuck line. Remove packaging grid lines, small ripples, button pulls and bunching over the belt.
How do I fix a tucked-in shirt that bunches at the waist?
Use Filter > Liquify with the Forward Warp tool and a large brush to push the puffed parts gently inward, with the arms and background frozen. Then soften the folds inside with frequency separation or the Patch Tool.
Can you remove wrinkles from a striped shirt in Photoshop?
Yes, but avoid blur, because it bends the stripes. Use the Clone Stamp and sample along the same stripe so the lines continue straight across the fixed area.