Can You Remove Wrinkles from Clothes in Lightroom?
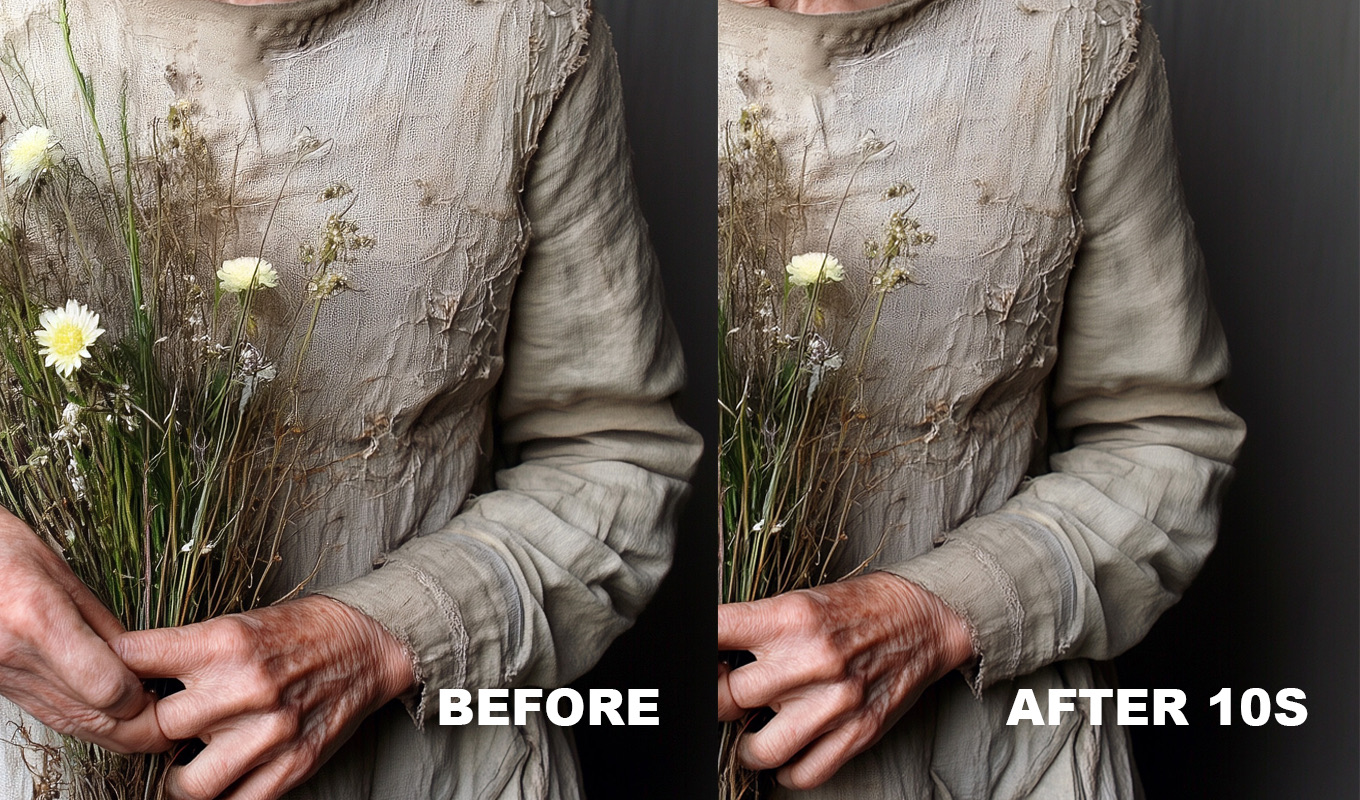
Short answer: Lightroom can soften wrinkles in clothes and remove a few single creases. It cannot properly remove them. There is a clear line where Lightroom stops, and the reason is the same one that stops real skin retouching there: Lightroom has no layers.
I edit every session in Lightroom first, so this is not a "Lightroom is bad" post. Here is exactly what works, how to do it, and when to send the photo to Photoshop.
What Works in Lightroom
Three tools do useful work on fabric. Use them in this order: remove the worst single creases, soften the rest, then lift any dark lines that still show.
1. The Remove Tool for Single Creases
In Lightroom Classic, open the Develop module and pick the Remove tool (shortcut Q). It has three modes: Content-Aware Remove, Heal and Clone.
- Use Content-Aware Remove for one sharp crease on plain fabric. Paint over the crease in one stroke and let Lightroom pick the source.
- Use Heal when you want to choose the source yourself. Drag the source circle onto clean fabric with the same light and the same weave direction.
- Newer versions also offer a Generative AI option in the Remove tool. It needs an internet connection and, like Generative Fill in Photoshop, it invents new pixels, so check that the fabric still looks like the same fabric.
This is fine for two or three creases. On a whole wrinkled shirt it gets slow and messy, with smudges and repeated patches.
2. A Clothes Mask with Negative Texture and Clarity
This is the main trick for soft wrinkles.
- Open Masking. Choose People, select the person, and tick Clothes. Lightroom builds a mask of the garment. If it is not detected well, use a Brush mask and paint the garment by hand.
- Lower Clarity, often somewhere around -20 to -40. This reduces the midtone contrast that makes folds look deep.
- Lower Texture a little, around -10 to -30. Go easy: Texture also flattens the weave, and too much makes cotton look like plastic.
- Optionally lower Dehaze slightly for heavy folds. Watch that the color does not go flat and gray.
The wrinkles stay, but they get shallower and calmer. On a headshot at screen size that can be enough.
3. Dodge the Crease Shadows
A wrinkle is a dark line next to a light line. You can paint over the dark line with a small Brush mask and raise Exposure a little (around +0.2 to +0.4) or raise Shadows. This is manual dodging, and on a few creases it works surprisingly well. On a whole shirt it takes a long time.
Iron Pro: the wrinkle remover for Photoshop
One click builds the setup, then you paint over the wrinkles. Clothes and backdrops smooth out, the fabric keeps its texture, and every slider stays adjustable.
GET IRON PRO →“I used to spend so much time fixing little wrinkles in clothes. Now I can focus on making my photos beautiful instead of worrying about every tiny crease.”
“I'm a photographer, not a dry cleaner! I swear every photoshoot has at least one wrinkled shirt, dress or pair of trousers. This tool will save me in fashion weeks for suuure!”
“Wedding dresses are beautiful, but after hours of walking, sitting, hugging and dancing, they can become a retouching nightmare. This has made my workflow so much easier.”
“I swear clothes always look more wrinkled in photos than they do in real life. A few brush strokes and the clothes look so much better!”
“I used to spend so much time fixing little wrinkles in clothes. Now I can focus on making my photos beautiful instead of worrying about every tiny crease.”
“I'm a photographer, not a dry cleaner! I swear every photoshoot has at least one wrinkled shirt, dress or pair of trousers. This tool will save me in fashion weeks for suuure!”
“Wedding dresses are beautiful, but after hours of walking, sitting, hugging and dancing, they can become a retouching nightmare. This has made my workflow so much easier.”
“I swear clothes always look more wrinkled in photos than they do in real life. A few brush strokes and the clothes look so much better!”
Lightroom Mobile Notes
On a phone or iPad, Lightroom mobile has the same ideas in a smaller space. The Remove tool (Heal) handles single creases. Masking with People and Clothes, then negative Clarity and Texture, softens the rest. It is handy for a quick social media version. For client delivery, I would still finish on a computer.
Why Lightroom Stops
To actually remove a wrinkle while keeping the fabric, you need to separate the light and shadow of the fold from the fine weave of the fabric. That is frequency separation, and it needs two layers: one for tone, one for detail. Lightroom has no layer system, so it is not possible there. It is not a setting you are missing.
Texture and Clarity sliders work on the whole masked area at once. They reduce contrast at a certain size of detail, so they soften the fold and the weave together. That is why heavy Lightroom fabric edits look either still wrinkled or plastic. The same limit applies to skin, which I explain in can you retouch skin in Lightroom.
| TASK | LIGHTROOM | NEEDS PHOTOSHOP |
|---|---|---|
| Remove 1 to 3 single creases | Yes (Remove tool) | No |
| Soften soft wrinkles a little | Yes (Clothes mask, negative Clarity) | No |
| Remove wrinkles, keep the weave | No | Frequency separation |
| Packaging grid lines across a shirt | Slow, messy | Healing on a layer, or frequency separation |
| Wrinkled backdrop | Softens only | Blur on a mask |
| Tucked-in bunching, wavy placket | No | Liquify |
Lightroom Fabric Mistakes to Avoid
- Too much negative Texture. The weave disappears before the wrinkle does, and cotton starts to look like plastic. Clarity does more for folds, so lead with Clarity and keep Texture small.
- A mask that spills. The Clothes mask sometimes catches hands, hair or the edge of the backdrop. Subtract those parts with a Brush set to Subtract, or the negative Clarity makes them look hazy.
- Gray, flat color. Negative Dehaze and Clarity both lower contrast, and a black suit can turn charcoal. Add a little Contrast or lower Blacks inside the same mask.
- Healing over seams. Content-Aware Remove does not know where the seam is. Stop the stroke before it reaches a seam, a button or a pocket edge.
The Round Trip to Photoshop
This is what I do with the frames that need real fabric work.
- Finish color and exposure in Lightroom first.
- Select the photo and press Cmd/Ctrl+E (Photo > Edit In > Edit in Adobe Photoshop). Lightroom sends a copy with your edits.
- Remove the wrinkles in Photoshop. The methods are in how to remove wrinkles from clothes in Photoshop.
- Save and close. The edited file comes back into your Lightroom catalog next to the original.
For a shirt, the part-by-part steps are in how to iron a shirt in Photoshop. For a dress, see removing wrinkles from a wedding dress.
Where Iron Pro Fits
I make Iron Pro, so weigh that. It is a Photoshop plugin, not a Lightroom one, because it needs layers for the same reason frequency separation does. In the round trip it sits at step 3: you set the Blur Radius, press RUN IRON, and paint white on a mask over the wrinkles. It is not AI and works offline. It does not work inside Lightroom, and it works on one photo at a time, so it is for the frames you send over, not for the whole gallery.
One practical note: RUN IRON flattens the document and converts it to 8-bit if needed. In a Lightroom round trip that is usually fine, because the file Lightroom sends is already a separate copy.
Iron Pro: the wrinkle remover for Photoshop
One click builds the setup, then you paint over the wrinkles. Clothes and backdrops smooth out, the fabric keeps its texture, and every slider stays adjustable.
GET IRON PRO →My Rule of Thumb
If the wrinkle should look softer, Lightroom. If it should be gone, Photoshop. A slightly creased sleeve in a wide family photo: a Clothes mask with negative Clarity and done. A packaging crease across the chest in a headshot the client will use for years: send it to Photoshop. Knowing which is which before you start saves you from pushing sliders that were never going to get there.
Frequently Asked Questions
Can you remove wrinkles from clothes in Lightroom?
Partly. The Remove tool takes out a few single creases, and a Clothes mask with negative Clarity and Texture softens soft wrinkles. Removing wrinkles while keeping the fabric texture needs layers, so it has to be done in Photoshop.
How do I select clothes in Lightroom?
Open Masking, choose People, select the person and tick Clothes. Lightroom creates a mask of the garment. If it misses parts, add to it or use a Brush mask and paint the garment by hand.
Does negative Texture remove wrinkles in Lightroom?
Not really. Texture softens medium-size detail, so it flattens the fabric weave more than the fold. Negative Clarity does more for wrinkles, but it only makes them shallower, it does not remove them.
Can Lightroom mobile remove wrinkles from clothes?
It can soften them. Use the Remove tool for single creases and a People mask with Clothes selected, then lower Clarity and Texture. For client work, finish the fabric in Photoshop on a computer.
How do I send a photo from Lightroom to Photoshop?
Select the photo and press Cmd/Ctrl+E, or go to Photo > Edit In > Edit in Adobe Photoshop. Edit it, save and close, and the edited copy appears in your Lightroom catalog next to the original.