How to Fix a Wrinkled Shirt in a Headshot
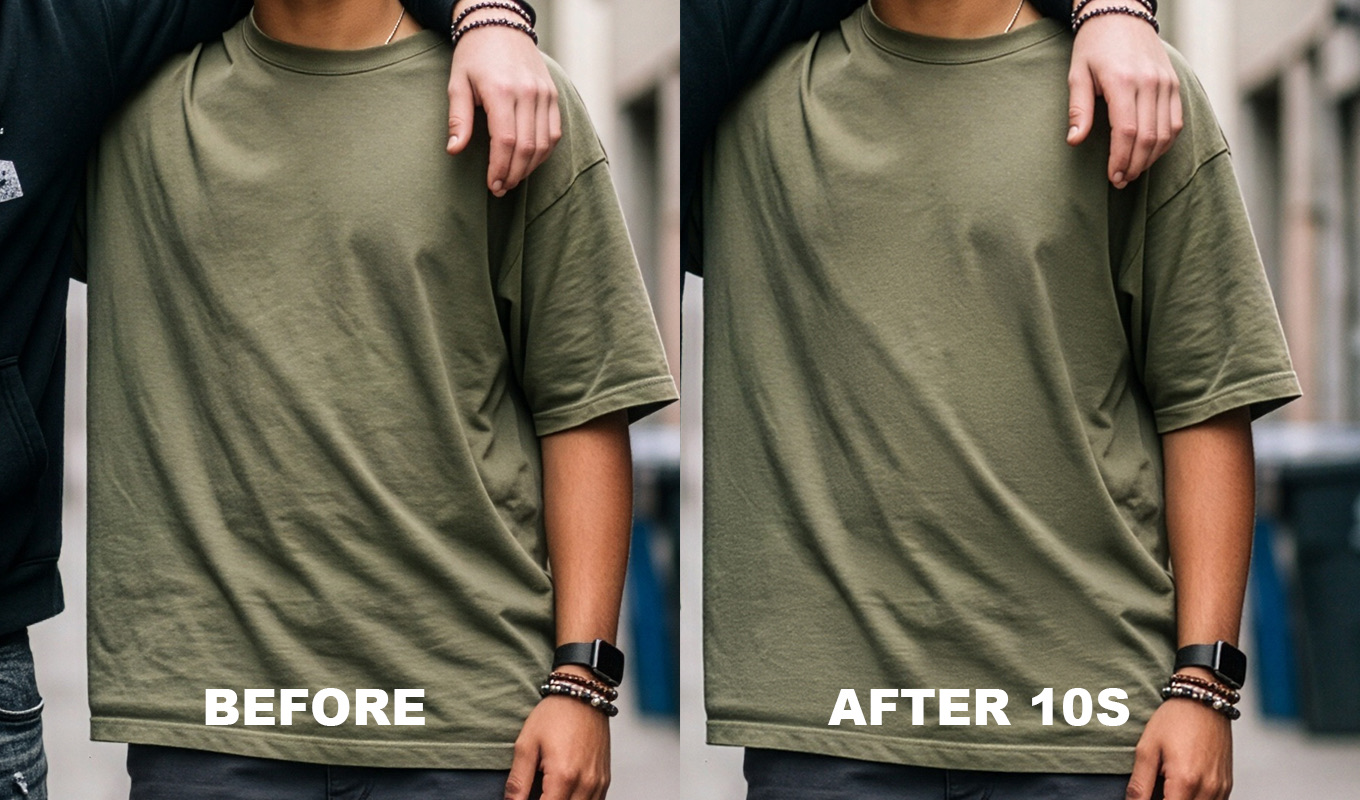
The face is sharp, the light is right, the expression works. Then you zoom in and there it is: a fold line across the chest from the shop packaging, a collar point curling up, and a bunch of fabric where the jacket buttons. In a LinkedIn photo that small crop is almost all shirt and jacket, so people see it.
This guide is for headshot and LinkedIn photographers. It covers which creases to remove and which to leave, the manual fix in Photoshop, and a faster workflow for a headshot day when you have a long list of people to deliver. The full general method for any garment lives in the main guide: how to remove wrinkles from clothes in Photoshop.
Which Creases Read as Untidy
Not every fold is a problem. Fabric that never folds looks like plastic, and a suit jacket with no shape looks like a cardboard cutout. The question is whether a crease looks like the person got dressed carefully this morning, or not.
These read as untidy, so remove or soften them:
- Packaging fold lines. The straight grid creases of a brand new shirt. They are the first thing people notice because nothing in nature makes a straight line across a chest.
- Placket pull. Small X shapes between the buttons when the shirt is a bit tight. Soften them, do not erase the placket itself.
- Bunching at the waist or above the jacket button. It happens when people sit for the photo. A little drape is fine, a pile of folds is not.
- Collar curl and a lifted collar point. Often easier to fix with the Clone Stamp than with smoothing.
- A twisted or crumpled tie. Small creases along the blade of the tie, especially on silk, catch the light.
- Shoulder puckering along the seam of a cheap or creased jacket.
These read as natural, so keep them:
- The roll of a jacket lapel. It is part of how the jacket is built.
- The dimple under a tie knot.
- Soft folds at the elbow and where the arm meets the body.
- Seams, the placket edge, the collar edge and pocket outlines. These define the garment. Smooth over them and the shirt stops looking like a shirt.
A simple test I use: if the crease would disappear when the person stands up straight and pulls the jacket down, remove it. If it would still be there, it is structure, keep it.
Prevent It on the Day
Five minutes before the shoot saves more time than any edit. Keep a handheld steamer and a lint roller at the set. Ask people to button the top button of a two button jacket and pull it down at the back, or sit on the tail of the jacket when they are seated so the collar does not ride up. A clip at the back of a loose shirt removes the side folds. Check the collar points and the tie knot before the first frame, not after the last.
The Manual Fix in Photoshop
For one or two headshots, the built-in tools are enough. Work on a duplicate so you can compare.
- Duplicate the layer. Press Cmd/Ctrl+J. Name it Clothes so you always know where the edit lives.
- Remove small creases with the Spot Healing Brush (J). Set it to Content-Aware, make the brush just wider than the crease, and paint along it in one stroke. This handles packaging lines on plain shirts well.
- Patch medium creases. Select the Patch Tool, draw around the fold, and drag the selection to a clean area of the same fabric nearby. Choose a source that has the same light direction or the patch will look flat.
- Clone along edges with the Clone Stamp (S). Near seams, the placket and the collar, the healing tools smear the edge. Use the Clone Stamp at 50 to 80 percent opacity, sample along the same line, and follow the seam.
- Smooth big soft folds with frequency separation. On a jacket front or a bunched waist, healing leaves blotches. Split the image into tone and texture and smooth only the tone. Fabric needs a much bigger blur radius than skin. The exact settings are in frequency separation for clothes.
- Check at 100 percent. Zoom in and look for smeared weave, repeated patches and areas that look softer than the rest of the shirt. Lower the layer opacity if the result looks too perfect.
If you only have Lightroom, you can still soften a crease with a mask and negative Texture, but there are no layers, so there is no real frequency separation. Here is what works there: removing wrinkles from clothes in Lightroom.
Iron Pro: the wrinkle remover for Photoshop
One click builds the setup, then you paint over the wrinkles. Clothes and backdrops smooth out, the fabric keeps its texture, and every slider stays adjustable.
GET IRON PRO →“I used to spend so much time fixing little wrinkles in clothes. Now I can focus on making my photos beautiful instead of worrying about every tiny crease.”
“I'm a photographer, not a dry cleaner! I swear every photoshoot has at least one wrinkled shirt, dress or pair of trousers. This tool will save me in fashion weeks for suuure!”
“Wedding dresses are beautiful, but after hours of walking, sitting, hugging and dancing, they can become a retouching nightmare. This has made my workflow so much easier.”
“I swear clothes always look more wrinkled in photos than they do in real life. A few brush strokes and the clothes look so much better!”
“I used to spend so much time fixing little wrinkles in clothes. Now I can focus on making my photos beautiful instead of worrying about every tiny crease.”
“I'm a photographer, not a dry cleaner! I swear every photoshoot has at least one wrinkled shirt, dress or pair of trousers. This tool will save me in fashion weeks for suuure!”
“Wedding dresses are beautiful, but after hours of walking, sitting, hugging and dancing, they can become a retouching nightmare. This has made my workflow so much easier.”
“I swear clothes always look more wrinkled in photos than they do in real life. A few brush strokes and the clothes look so much better!”
The Fast Way With Iron Pro
I built Iron Pro because the manual version is slow on a busy headshot day. It is a Photoshop plugin from the makers of RetouchLab Skin Pro, same engine, tuned for fabric. It is not AI: it builds filter and layer based setups on your computer and works offline.
- Save first or work on a copy. Iron Pro flattens the document and converts it to 8-bit if needed.
- Set the Blur Radius before you press Run Iron. Default is 20 px. Fine shirt creases sit well around there. Suit jacket folds usually want more.
- Press RUN IRON. It builds a Zone 1 group with a black mask, so nothing changes yet.
- Paint white on the mask over the creases. Press X to swap to black and erase where you went too far. Change the brush size with [ and ].
- Adjust live. Smoothing (default 80) controls how flat the fabric gets. New Texture and Fabric Detail bring the weave back so the shirt does not look painted. Clarity and Grain stay at 0 unless you need them.
Jacket and shirt in the same photo
A wool jacket and a cotton shirt do not want the same setting. Do the jacket first with a larger Blur Radius, then press + NEW ZONE. The new zone is a second group with its own settings, so you can use a smaller radius for the shirt and paint it separately.
Everything stays non-destructive until you flatten, and one undo takes a step back.
A Headshot Day With Many People
Team headshots are where wrinkles cost real time. My order of work:
- Cull and colour everyone in Lightroom first, and sync the settings across each person's set.
- Send only the final picks to Photoshop with Cmd/Ctrl+E. Never fix a frame nobody chose.
- Do the clothes pass. Write down the Blur Radius and slider numbers that worked for a jacket and for a shirt, and reuse them for the next person in a similar outfit. It keeps the whole team looking consistent.
- Skin is a separate job: I do it with RetouchLab Skin Pro.
- Save and let the file return to the catalog, then export.
More on cutting time across a whole session: how to speed up your editing workflow.
What Not to Smooth
- Striped and checked shirts. Smoothing blurs the pattern. Use the Clone Stamp along the stripe direction instead, and keep any smoothing brush off the print.
- Logos and embroidered names on polos and company jackets. Mask them out.
- Structural folds. The lapel roll, the collar band and the shoulder line give the jacket its shape. Keep them or fix them with Clone or Patch.
- Missing fabric. If a collar is folded under and the fabric is not in the frame, no smoothing tool will rebuild it. That is cloning work, or a reshoot.
Iron Pro has the same limits. It softens wrinkles and creases, it does not rebuild missing fabric or fix hard structural folds, and it works one photo at a time, not as a batch. For pressing a shirt in more detail, see how to iron a shirt in Photoshop.
Iron Pro: the wrinkle remover for Photoshop
One click builds the setup, then you paint over the wrinkles. Clothes and backdrops smooth out, the fabric keeps its texture, and every slider stays adjustable.
GET IRON PRO →The goal is not a shirt that looks new from the factory. It is a person who looks like they took care getting ready. Remove the lines that distract, keep the ones that give the clothes their shape, and the headshot reads as calm and professional.
Frequently Asked Questions
How do I fix a wrinkled shirt in Photoshop?
Duplicate the layer, remove small creases with the Spot Healing Brush, patch medium ones from clean fabric nearby, clone along seams and the collar, and smooth large soft folds with frequency separation. Check the result at 100 percent and lower the opacity if it looks too perfect.
Should I remove all wrinkles from a shirt in a headshot?
No. Remove packaging lines, bunching and collar curl, but keep the lapel roll, seams, the tie dimple and soft folds at the elbow. Fabric with no folds at all looks fake.
How do I fix a wrinkled shirt in a LinkedIn photo?
Crop first so you only fix what will be seen, then heal the obvious crease lines on the chest and collar. For a quick result on a plain shirt, the Spot Healing Brush set to Content-Aware handles most packaging lines in a few strokes.
How do I smooth suit jacket creases in a photo?
Use frequency separation with a larger blur radius than you would use for a shirt, and smooth only the tone layer so the wool texture stays. Leave the lapel roll and shoulder line alone, they are part of the jacket's shape.
Can I remove wrinkles from a shirt in Lightroom?
Only lightly. A brush mask with negative Texture and Clarity softens creases, and the Healing tool removes small lines, but Lightroom has no layers, so there is no real frequency separation for larger folds.