Frequency Separation for Clothes
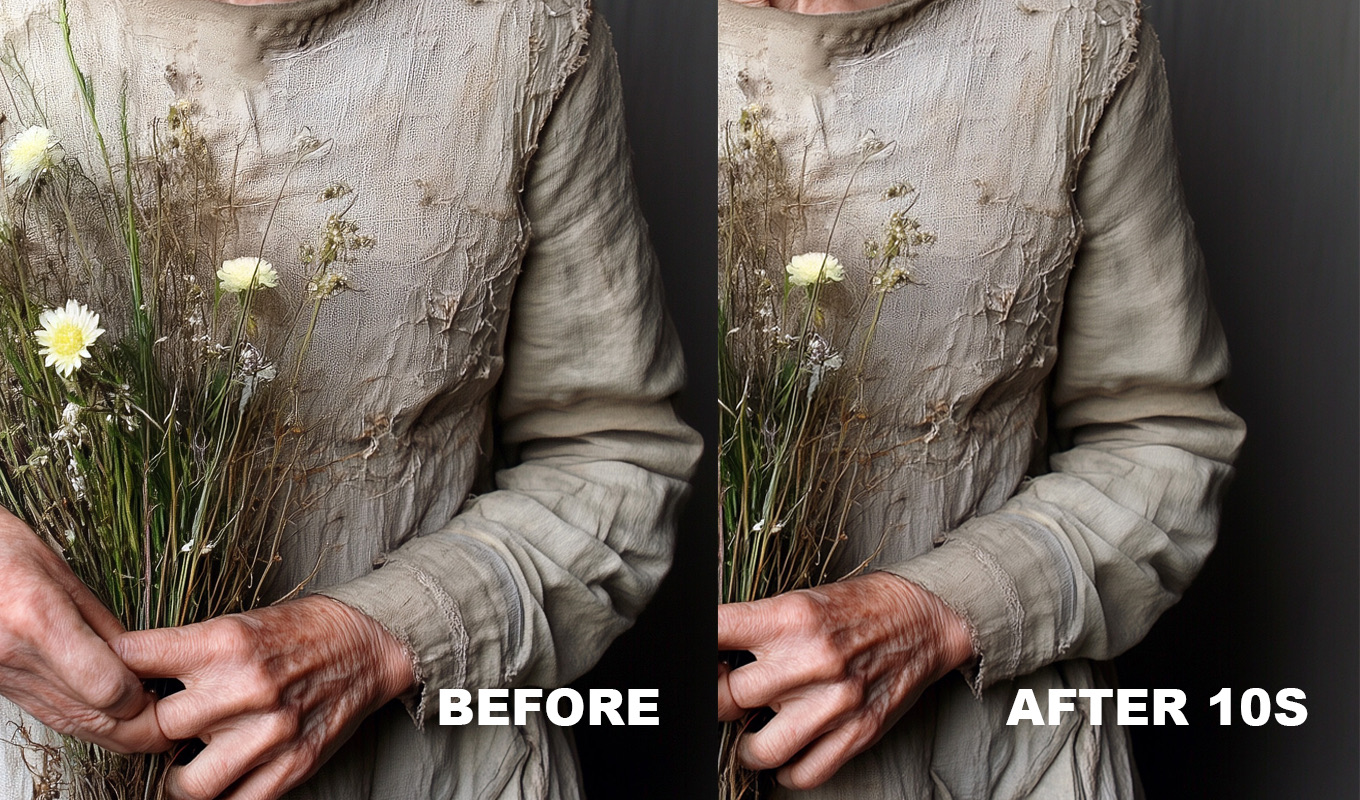
Frequency separation is usually taught for skin. It works just as well on fabric, and for big soft wrinkles it is the best manual method there is. The idea is the same: a wrinkle is mostly light and shadow (tone) sitting on top of the weave (texture). Split the two onto separate layers, smooth only the tone, and the fabric keeps its real texture.
If you have never done frequency separation at all, the skin version explains the basics with more pictures: frequency separation in Photoshop, steps and settings. Here I only cover what changes for clothes. For the full overview of every method, see the main guide: how to remove wrinkles from clothes in Photoshop.
Why Fabric Needs a Bigger Radius
On skin you blur just enough to make the pores disappear, a few pixels. A pore is tiny. A wrinkle is not. A shirt crease is a soft gradient of light and shadow that can run across a large part of the frame, and the weave underneath is finer than the crease.
So the blur radius on the low layer has to be large enough that the weave is gone and the wrinkle is left as a soft smear of tone. If the radius is too small, part of the crease ends up on the texture layer, and smoothing the tone will never fully remove it. You will see a faint line where the crease was.
My starting points, on a typical 24 megapixel file, then adjust by eye:
- Fine shirt creases: around 15 to 25 px.
- Jacket folds, bunched waist, dress skirts: 30 to 50 px.
- Backdrops and large draped fabric: 60 px and more.
Larger files need larger numbers, smaller web files need smaller ones. The test is always the same: hide the top layer and look at the low layer. You should see the shape and colour of the garment, no weave, and the wrinkles as soft shading.
Gaussian or Median?
Both work. Gaussian Blur gives the smoothest tone, but at big radii it bleeds colour across edges, so a white shirt picks up the dark jacket next to it. Median (Filter > Noise > Median) keeps edges like seams, the placket and the garment outline much cleaner. For clothes I usually prefer Median for exactly that reason.
Frequency Separation for Clothes, Step by Step
- Duplicate the layer twice. Press Cmd/Ctrl+J twice. Name the lower copy Low and the upper copy High. Hide High for now.
- Blur the Low layer. Select Low and run Filter > Blur > Gaussian Blur or Filter > Noise > Median. Raise the radius until the weave disappears and the wrinkles are soft shading. Note the number.
- Run Apply Image on the High layer. Show and select High, then Image > Apply Image. Layer: Low. Channel: RGB. For an 8-bit file: Invert off, Blending Subtract, Scale 2, Offset 128. For a 16-bit file: Invert on, Blending Add, Scale 2, Offset 0. Check your bit depth under Image > Mode first. The 8-bit settings on a 16-bit file give a harsh, broken result.
- Set the High layer to Linear Light. The image should now look exactly like the original. Select both layers and group them (Cmd/Ctrl+G) so you can toggle the whole edit on and off.
- Smooth the wrinkles on the Low layer. Use the Mixer Brush or a feathered Lasso and blur, both explained below. This is where the work happens.
- Leave the High layer mostly alone. Only fix sharp crease lines that are still visible, with the Clone Stamp (S) set to Current Layer, sampling along the direction of the weave.
- Mask and check. Add a mask to the group so the edit only touches the garment, then zoom to 100 percent. If the fabric looks painted, lower the group opacity.
Iron Pro: the wrinkle remover for Photoshop
One click builds the setup, then you paint over the wrinkles. Clothes and backdrops smooth out, the fabric keeps its texture, and every slider stays adjustable.
GET IRON PRO →“I used to spend so much time fixing little wrinkles in clothes. Now I can focus on making my photos beautiful instead of worrying about every tiny crease.”
“I'm a photographer, not a dry cleaner! I swear every photoshoot has at least one wrinkled shirt, dress or pair of trousers. This tool will save me in fashion weeks for suuure!”
“Wedding dresses are beautiful, but after hours of walking, sitting, hugging and dancing, they can become a retouching nightmare. This has made my workflow so much easier.”
“I swear clothes always look more wrinkled in photos than they do in real life. A few brush strokes and the clothes look so much better!”
“I used to spend so much time fixing little wrinkles in clothes. Now I can focus on making my photos beautiful instead of worrying about every tiny crease.”
“I'm a photographer, not a dry cleaner! I swear every photoshoot has at least one wrinkled shirt, dress or pair of trousers. This tool will save me in fashion weeks for suuure!”
“Wedding dresses are beautiful, but after hours of walking, sitting, hugging and dancing, they can become a retouching nightmare. This has made my workflow so much easier.”
“I swear clothes always look more wrinkled in photos than they do in real life. A few brush strokes and the clothes look so much better!”
Smoothing the Low Layer
Mixer Brush
Select the Mixer Brush (it shares a slot with the Brush Tool). Turn off Load the brush after each stroke, turn on Clean the brush after each stroke, and set Sample All Layers off so it only reads the Low layer. Start with low Wet and Mix values, around 10 to 20 percent, and a soft brush wider than the wrinkle. Stroke along the wrinkle, not across it. The brush pushes the light and dark of the crease together until the tone is even. Build up in short strokes rather than one heavy pass.
Lasso and blur
For big soft folds this is faster. Draw a loose Lasso selection around one wrinkle, with some clean fabric on both sides. Feather it generously with Select > Modify > Feather, then run Gaussian Blur on the selection at a radius larger than the one you used for the Low layer. Because the weave is on the High layer, the blur only evens out the tone. Repeat for each fold. Keep selections inside the garment edge so the background colour does not bleed in.
Soft brush with sampled colour
On plain fabric you can also paint with a normal soft brush at 10 to 20 percent opacity, holding Alt/Option to sample the colour next to the crease. It is slower and needs a steady hand, but it gives the most control in small areas.
Keep the Weave on the High Layer
The High layer is the fabric itself: the twill of denim, the knit of a jumper, the slub of linen. If you paint or blur on it, the result looks like smudged plastic. Most bad fabric retouching comes from working on the wrong layer.
- Clone on the High layer only to remove a sharp crease edge, and sample from the same row of weave so the pattern lines up.
- Watch for repeated patches. The eye spots a repeated knit pattern quickly.
- On lace, sheer fabric and heavy prints, frequency separation does not help much: the pattern is the texture, and the tone is part of the pattern. Clone carefully or leave it. The wedding dress guide covers this in detail: removing wrinkles from a wedding dress.
Common Mistakes
- Radius too small. The crease survives on the High layer as a faint line.
- Radius too big with Gaussian. Colour halos along the garment edges. Switch to Median or mask the edges.
- Over-flattening. Fabric has drape. Remove every fold and the garment looks pasted on. Keep the folds that show how it hangs.
- Smoothing structure. Seams, collars, pleats and the lapel roll are design, not wrinkles. For pressing a shirt properly without losing its shape, see how to iron a shirt in Photoshop.
The One-Click Version
I make Iron Pro, a Photoshop plugin that automates a close variant of this setup. It is not AI. It builds ordinary Photoshop layers on your computer, so you can open the group and see what it did.
- Color layer: a Median blur, the smoothing. Same job as the Low layer above.
- OG Texture layer: High Pass in Linear Light, the original fabric detail. Same job as the High layer, made with Filter > Other > High Pass instead of Apply Image, so the Fabric Detail slider can control how strong it is.
- New Texture layer: 50 percent gray with noise in Overlay, a fine texture added back so smoothed areas never look plastic.
- Clarity and Grain layers appear only if you raise those sliders above 0.
Instead of the Mixer Brush, you paint white on a black mask over the wrinkles, and press X to erase. Set the Blur Radius (5 to 100 px, default 20) before you press RUN IRON. Smoothing, New Texture and Fabric Detail change live after painting. Two honest differences from the manual version: it flattens your document first and converts it to 8-bit if needed, so save a copy, and it softens wrinkles rather than rebuilding missing fabric.
Iron Pro: the wrinkle remover for Photoshop
One click builds the setup, then you paint over the wrinkles. Clothes and backdrops smooth out, the fabric keeps its texture, and every slider stays adjustable.
GET IRON PRO →Learn the manual version once. Even if you end up using a plugin, knowing which layer holds the tone and which holds the weave tells you exactly why a result looks wrong and how to fix it.
Frequently Asked Questions
Can you use frequency separation on clothes?
Yes. It works well for large soft wrinkles because the crease is mostly tone and the weave is texture. Smooth the tone on the low layer and the fabric keeps its real texture on the high layer.
What blur radius should I use for frequency separation on fabric?
Much bigger than for skin. As a starting point on a 24 megapixel file, around 15 to 25 px for shirt creases, 30 to 50 px for jacket folds and skirts, and 60 px or more for backdrops. Adjust until the weave is gone from the low layer.
Should I use Gaussian Blur or Median for clothes?
Either works. Median keeps seams and garment edges cleaner at big radii, while Gaussian can bleed colour across edges, so many retouchers prefer Median for fabric.
What are the Apply Image settings for 16-bit frequency separation?
Layer set to your low layer, Channel RGB, Invert on, Blending Add, Scale 2, Offset 0. For 8-bit files use Invert off, Subtract, Scale 2, Offset 128.
Why does my fabric look plastic after frequency separation?
Usually you painted or blurred on the high layer, which holds the weave, or you removed every fold including the natural drape. Work only on the low layer and keep the folds that show how the garment hangs.