How to Remove Shine from a Face in Lightroom
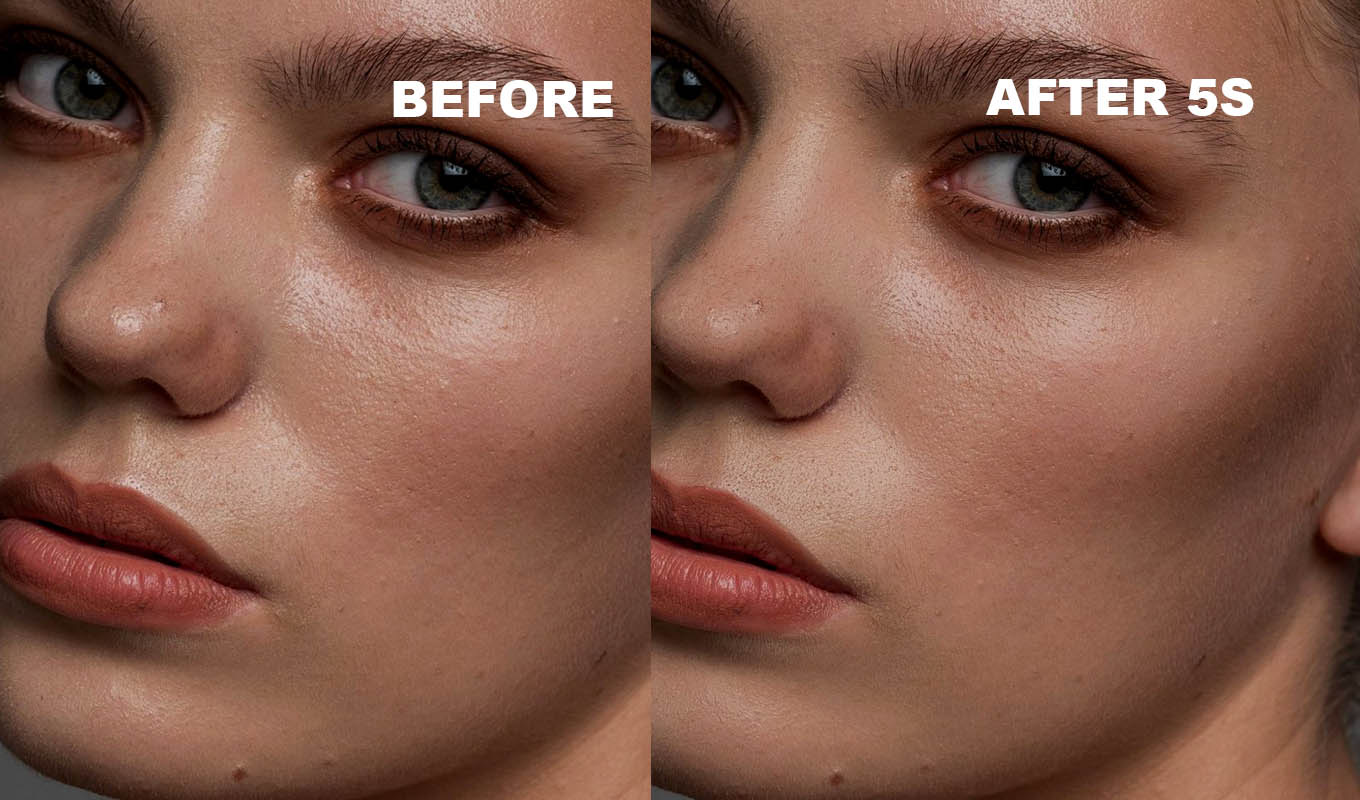
If you deliver a lot of headshots or event photos from Lightroom, sending every shiny forehead to Photoshop takes forever. Lightroom can handle mild shine well, as long as you limit the adjustment to the shine itself. Here is how I do it, and where Lightroom runs out.
The Problem with a Plain Brush Mask
The obvious move is a brush over the forehead with Highlights pulled down. It works, but it darkens everything you painted, including skin that was never shiny. You get a gray patch on the forehead. The fix is to tell Lightroom to only touch the bright pixels inside your brush.
Step 1: Brush Over the Shine
- Open Masking and create a new Brush mask.
- Set Feather high and Flow low, and paint loosely over the shiny areas: forehead, nose, chin, cheekbones.
- Do not try to paint exactly. The next step does the precise part.
If you have many photos of the same person, Select People > Face Skin is a quick start instead of the brush.
Step 2: Limit It to the Bright Pixels
- With the mask selected, choose Intersect and then Luminance Range.
- Use the eyedropper on the shine, or drag the range so only the top of the brightness is included.
- Soften the range edges so the transition into normal skin is smooth.
- Turn on the mask overlay. Only the hot spots should be highlighted.
This is the Lightroom version of Darken blend mode in Photoshop: the adjustment only lands on pixels brighter than the skin around them.
Matte Pro: remove shine from skin in Photoshop
One click builds the setup, then you paint over the shiny skin. Only the spots brighter than the skin around them are toned down, and the pores stay.
GET MATTE PRO →“I love natural skin retouching, and this makes it so easy to get rid of unwanted shine without losing that beautiful skin texture. Exactly what I've been looking for!”
“I used to spend so much time fixing skin manually. Now I just grab the brush and go over the areas that need it. Such a small thing, but it makes my editing so much easier!”
“Summer weddings are beautiful until you open the portraits and realise everyone is glowing a little TOO much. This has saved me so much time fixing shiny foreheads and cheeks.”
“One of those little Photoshop tools that makes a surprisingly big difference. I used to spend time manually reducing shiny spots with different techniques. Now I can do it in seconds.”
“I love natural skin retouching, and this makes it so easy to get rid of unwanted shine without losing that beautiful skin texture. Exactly what I've been looking for!”
“I used to spend so much time fixing skin manually. Now I just grab the brush and go over the areas that need it. Such a small thing, but it makes my editing so much easier!”
“Summer weddings are beautiful until you open the portraits and realise everyone is glowing a little TOO much. This has saved me so much time fixing shiny foreheads and cheeks.”
“One of those little Photoshop tools that makes a surprisingly big difference. I used to spend time manually reducing shiny spots with different techniques. Now I can do it in seconds.”
Step 3: Tone the Shine Down
- Highlights: pull down first. This does most of the work.
- Exposure: a small negative amount if the shine is still bright.
- Saturation or a warm color tint: shine is often whiter than skin. A tiny warm tint can bring the skin color back into it.
- Texture and Clarity: leave them alone or keep them small. Pulling them down here makes the skin look waxy.
Leave a soft highlight on the nose and cheekbones. A fully matte face looks flat.
Step 4: Hard Hot Spots
A flash reflection that is pure white has no skin detail left, so no slider brings it back. Use the Remove tool (or Heal) on the spot, choose a source of similar skin, then lower the tool's Opacity so it blends with what was there. Small spots only. On large areas the healing repeats texture.
When to Use Photoshop
If the shine covers a large area, has washed out the pores, or the luminance range also catches the eyes and teeth, Photoshop does it better. Press Cmd/Ctrl+E to send the photo with your Lightroom edits, paint in Darken mode or clone in real texture, and save. The Photoshop methods are in how to remove shine from a face in Photoshop.
I make Matte Pro, so weigh that. It is a Photoshop plugin that sets up the Darken mode fix in one click, with layers that keep the skin detail, and you paint over the shine. It does not run inside Lightroom, only in Photoshop.
Lightroom vs Photoshop for Shine
| SHINE | LIGHTROOM | PHOTOSHOP |
|---|---|---|
| Mild sheen on forehead | Brush plus Luminance Range | Not needed |
| Small white hot spot | Remove tool at low opacity | Clone Stamp in Darken |
| Large greasy area | Gets gray and flat | Darken painting or Matte Pro |
| Sweat drops | Remove tool, one by one | Spot Healing Brush |
More on Lightroom's limits with skin in can you retouch skin in Lightroom and how to smooth skin in Lightroom. For sweaty event photos, see how to remove sweat in Photoshop.
Matte Pro: remove shine from skin in Photoshop
One click builds the setup, then you paint over the shiny skin. Only the spots brighter than the skin around them are toned down, and the pores stay.
GET MATTE PRO →Frequently Asked Questions
How do I remove shine from a face in Lightroom?
Paint a Brush mask over the shiny areas, intersect it with a Luminance Range so only the brightest pixels are selected, then lower Highlights and a little Exposure. Keep a soft highlight so the face does not look flat.
Why does my face look gray after removing shine in Lightroom?
The brush darkened skin that was not shiny. Intersect the mask with a Luminance Range so the adjustment only affects the bright spots.
Can Lightroom fix a pure white hot spot?
Not with sliders, because there is no detail left. Use the Remove or Heal tool with a source of similar skin and lower its opacity, or fix it in Photoshop.
Is Lightroom or Photoshop better for oily skin?
Lightroom handles mild sheen well with a brush and a Luminance Range. Large greasy areas and washed out texture are easier in Photoshop with Darken mode painting or the Clone Stamp.