Remove Shine from a Face in a Photo for Free
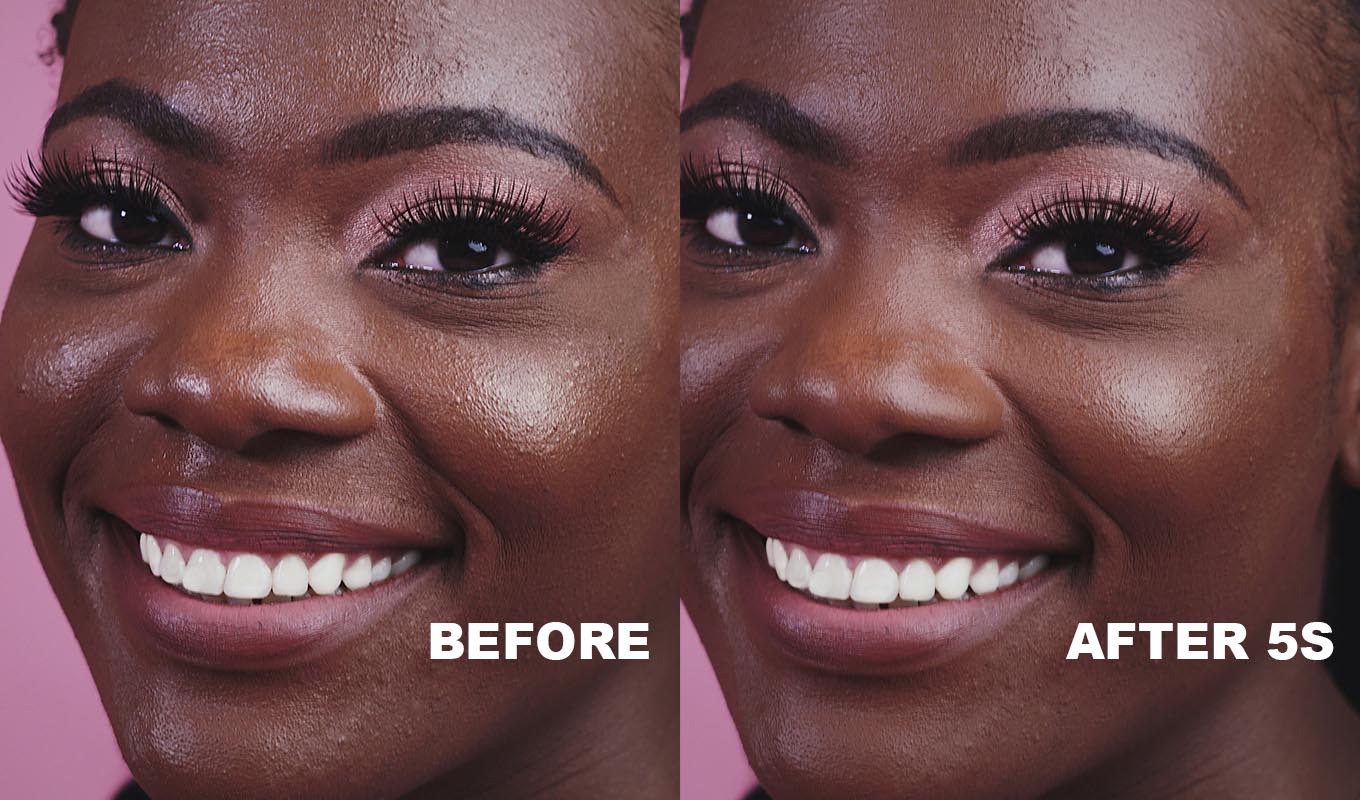
You do not need to buy anything to remove shine from a face. If you have Photoshop, every tool in this guide is already in it. If you do not, the same method works in free editors. Here are the free ways I use, from the quickest to the most careful, and the one rule that keeps a face looking alive.
The rule: reduce shine to a soft highlight, never to nothing. The bridge of the nose, the top of the cheekbones and a little glow on the forehead show the shape of the face. Take all of it away and the skin looks like paper. The longer version of this is in how to remove shine from a face in Photoshop.
Free Way 1: A Darken Layer
This is the fastest free method, and the one I use most.
- Add a new empty layer above the photo and set its blend mode to Darken.
- Pick a soft Brush (B) at 10 to 20% opacity.
- Hold Alt/Option and click on clean skin right next to the shine to sample its color.
- Paint over the shine in a few light passes. Sample again often, because skin color changes across the face.
- Lower the layer opacity if it looks too matte.
In Darken mode your color only shows where the photo is brighter than it. The shiny spot gets darker, the skin around it stays as it was, and because you paint at low opacity the pores stay visible.
Free Way 2: Healing in Darken Mode
When the shine has washed out the texture, color alone is not enough. Bring real skin in from next to it.
- Add an empty layer. Pick the Clone Stamp (S) or the Healing Brush (J).
- In the options bar set Mode to Darken and Sample to Current & Below. For the Clone Stamp, opacity around 20 to 30%.
- Alt/Option click on nearby skin with a similar tone, and paint over the shine in short strokes. Move the source often so the pores do not repeat.
The Healing Brush blends into its surroundings and is very quick on small hot spots. On a large shiny forehead it can smear, so I switch to the Clone Stamp there.
Matte Pro: remove shine from skin in Photoshop
One click builds the setup, then you paint over the shiny skin. Only the spots brighter than the skin around them are toned down, and the pores stay.
GET MATTE PRO →“I love natural skin retouching, and this makes it so easy to get rid of unwanted shine without losing that beautiful skin texture. Exactly what I've been looking for!”
“I used to spend so much time fixing skin manually. Now I just grab the brush and go over the areas that need it. Such a small thing, but it makes my editing so much easier!”
“Summer weddings are beautiful until you open the portraits and realise everyone is glowing a little TOO much. This has saved me so much time fixing shiny foreheads and cheeks.”
“One of those little Photoshop tools that makes a surprisingly big difference. I used to spend time manually reducing shiny spots with different techniques. Now I can do it in seconds.”
“I love natural skin retouching, and this makes it so easy to get rid of unwanted shine without losing that beautiful skin texture. Exactly what I've been looking for!”
“I used to spend so much time fixing skin manually. Now I just grab the brush and go over the areas that need it. Such a small thing, but it makes my editing so much easier!”
“Summer weddings are beautiful until you open the portraits and realise everyone is glowing a little TOO much. This has saved me so much time fixing shiny foreheads and cheeks.”
“One of those little Photoshop tools that makes a surprisingly big difference. I used to spend time manually reducing shiny spots with different techniques. Now I can do it in seconds.”
Free Way 3: Curves with Blend If
This one is good when the shine is spread over a big area, like a whole forehead under flash.
- Add a Curves adjustment layer and pull the top of the curve down a little, so the highlights darken.
- Select its mask and press Cmd/Ctrl+I to invert it to black.
- Paint white with a soft brush over the shiny areas only.
- Double click the layer to open Blending Options. Under Blend If, drag the black slider of Underlying Layer to the right, then hold Alt/Option and split it to soften the change.
Now the curve only reaches the brightest pixels inside your mask, which is the shine. If the darkened skin looks gray or dull, set the Curves layer to Luminosity blend mode and lower its opacity.
Free Way 4: Camera Raw Filter
If you like sliders, Photoshop's Camera Raw Filter (Filter > Camera Raw Filter) has the same masks as Lightroom. Make a Brush mask over the shine, then Intersect it with a Luminance Range so only the bright part is selected, and pull Highlights and Exposure down a little. It works on a layer, so convert the layer to a Smart Object first if you want to change it later. Step by step with the same masks: removing shine in Lightroom.
Free Way 5: For Heavy Beauty Work
For close-up beauty photos with a lot of shine, split the photo into a color layer and a texture layer with frequency separation. Fix the shine on the color layer with a soft brush or a little blur, and the pores on the texture layer stay exactly as they were. It is the most control and the slowest. The full setup: frequency separation in Photoshop.
No Photoshop? Free Editors
- Photopea runs free in a browser, has layers and a Darken blend mode, so Free Way 1 works the same way.
- GIMP is a free download. Its layer mode is called Darken only, and its Clone tool covers Free Way 2.
- Phone apps: most free apps have a healing brush that works on a small hot spot. For a whole shiny forehead a layer based editor gives you more control.
What Free Methods Cost
Free means you pay in time. On one headshot that is a few minutes. On a gallery of event or wedding photos it adds up fast, and it is easy to overdo it on photo 80 when your hand is tired. Watch for these:
- Painting in Normal mode: it lays flat color over the skin and the pores disappear.
- Content-Aware Fill on shine: it often removes pores or pulls in texture from the wrong area.
- Global Curves without a mask: it darkens every highlight, including the eyes and the background.
The Faster Paid Option
I make Matte Pro, so weigh that. It is a Photoshop plugin that does Free Way 1 for you, with the texture layers already built. You press REMOVE SHINE and paint white over the shiny skin. Only the spots brighter than the skin around them are toned down, and the pores stay.
- Shine Size (set before the button) matches small hot spots or big shiny areas, and it grows with the size of the photo.
- Matte Amount sets how much shine goes, Skin Detail and New Texture keep the pores. They stay adjustable after you paint.
It is not AI and runs offline. Limits: it flattens the file and converts it to 8-bit, so work on a copy. Keep the brush away from the eyes and lips. A spot that is pure white with no skin detail still needs the Clone Stamp. If you are comparing it with other tools, see the best shine remover plugins for Photoshop.
Matte Pro: remove shine from skin in Photoshop
One click builds the setup, then you paint over the shiny skin. Only the spots brighter than the skin around them are toned down, and the pores stay.
GET MATTE PRO →Start with the Darken layer. If you find yourself doing it on every photo of every shoot, that is the moment a plugin starts to make sense.
Frequently Asked Questions
How can I remove shine from my face in a photo for free?
In Photoshop, add an empty layer set to Darken, sample skin color next to the shine and paint over it with a soft brush at 10 to 20% opacity. Without Photoshop, the same works in Photopea in a browser or in GIMP, both free.
Can I remove shine from a face online for free?
Yes. Photopea is a free browser editor with layers and a Darken blend mode, so you can paint the shine down the same way as in Photoshop. Upload only photos you are allowed to edit.
How do I reduce shine on a face without losing texture?
Work at low opacity in Darken mode, or use the Clone Stamp or Healing Brush in Darken mode to bring in real texture from nearby. Avoid Normal mode painting and Content-Aware Fill, which flatten the pores.
Should I remove all the shine from a face?
No. Keep a soft highlight on the nose, cheekbones and brow bone. It shows the shape of the face. Remove only the hard hot spots and greasy patches.
Is there a free shine remover plugin for Photoshop?
The free route is the built-in tools: a Darken layer, Healing Brush, Clone Stamp and Curves. Dedicated shine plugins are paid, and several have trials or demos.