How to Fix a Wrinkled Backdrop in Lightroom
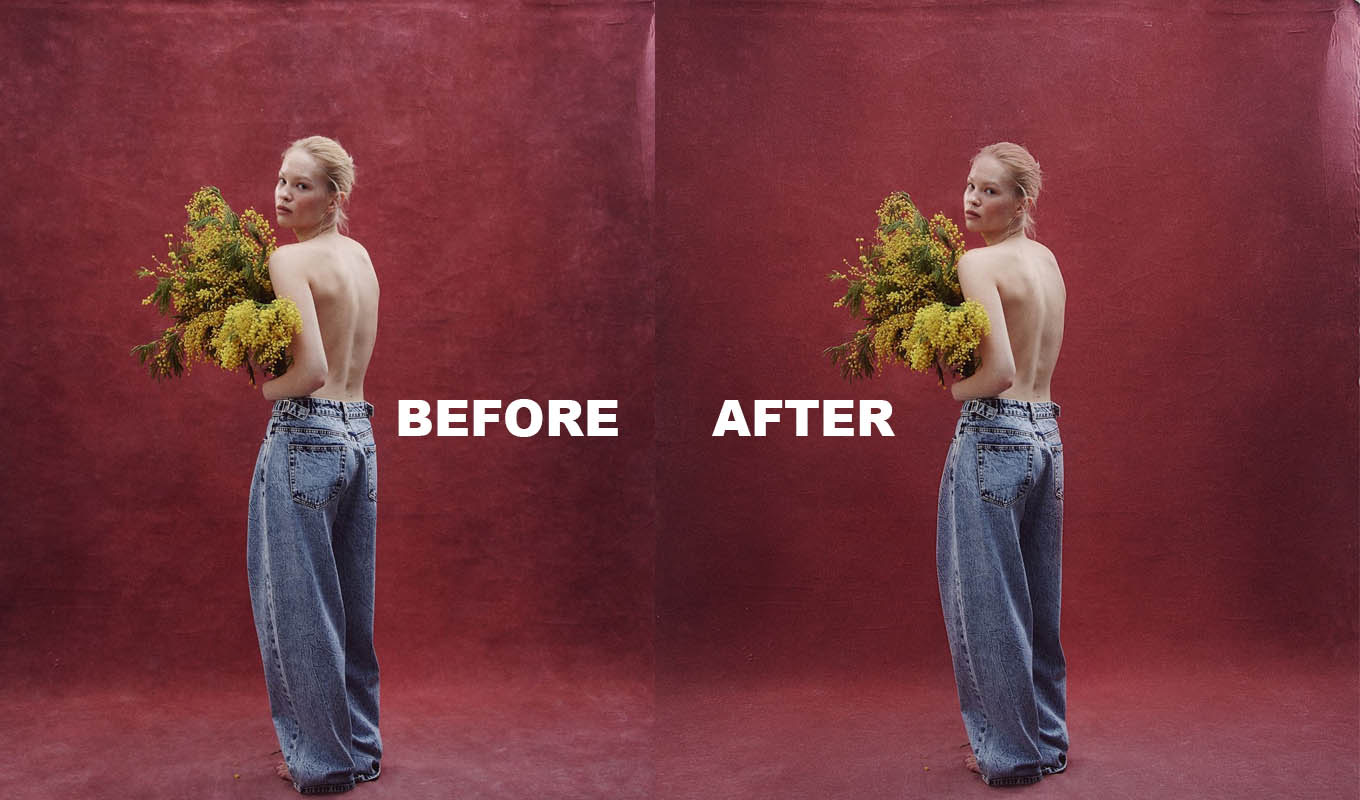
Most of my sessions live in Lightroom from import to export. So when a backdrop is wrinkled, my first question is whether I can fix it without leaving Lightroom. The honest answer: for soft folds, mostly yes. For deep creases in muslin or vinyl, no. Here is how far Lightroom goes, and the point where I send the photo to Photoshop.
Why Lightroom Struggles with Backdrops
A wrinkle on a backdrop is a band of light and shadow. In Photoshop you remove it by blurring a copy of the photo on a mask. Lightroom has no layers and no blur filter. Its tools can lower contrast and fine detail, and they can heal or remove small areas, but they cannot melt a big fold into the tone around it. Keep that in mind and you will not waste time pushing sliders that cannot do the job.
Step 1: Mask the Backdrop
- Open the Masking panel and choose Select Background. If your version does not show it, use Select Subject and then invert the mask.
- Zoom in on the hair edge. Subtract any hair the mask picked up with a soft brush, so the adjustment does not soften the person.
- If only part of the backdrop is wrinkled, intersect the mask with a brush and paint only over the folds.
Step 2: Soften the Folds
- Texture: pull it far down, often to the minimum. This softens the fine edges of creases.
- Clarity: pull it down to lower the midtone contrast of the folds. Too much and the backdrop starts to glow.
- Shadows: raise them so the dark side of each fold gets lighter. Highlights: lower them so the bright ridge drops. Together this flattens the fold.
- Dehaze: a small negative amount can soften what is left, but it also lowers color, so watch the backdrop color.
On a soft muslin backdrop this alone can be enough. On paper with sharp creases you will still see the lines, only softer.
Backdrop Pro: the backdrop wrinkle remover for Photoshop
One click builds the setup, then you paint over the backdrop. Wrinkles, creases and dust soften, grain is added back so the background does not band, and every slider stays adjustable.
GET BACKDROP PRO →“I can't explain how happy I am to spend less time fixing backdrops and more time enjoying photography. Something that used to take me ages now takes seconds. Such a relief!”
“I was genuinely surprised by how quickly this works. What used to take me several minutes now takes around 10-20 seconds. That's a huge difference when you're editing hundreds of images!”
“I'm extremely picky about my backgrounds. Even the tiniest crease drives me crazy once I open an image in Photoshop. A few strokes and my backdrop looks clean again. I'm obsessed!”
“I've tried different techniques for backdrop cleanup, but this is by far the fastest workflow I've found. The results are clean, and it takes seconds.”
“I can't explain how happy I am to spend less time fixing backdrops and more time enjoying photography. Something that used to take me ages now takes seconds. Such a relief!”
“I was genuinely surprised by how quickly this works. What used to take me several minutes now takes around 10-20 seconds. That's a huge difference when you're editing hundreds of images!”
“I'm extremely picky about my backgrounds. Even the tiniest crease drives me crazy once I open an image in Photoshop. A few strokes and my backdrop looks clean again. I'm obsessed!”
“I've tried different techniques for backdrop cleanup, but this is by far the fastest workflow I've found. The results are clean, and it takes seconds.”
Step 3: Remove Single Creases
For one sharp line, a dent in paper or a mark on the floor, use the Remove tool (or Healing in older versions). Paint along the crease in short strokes, check where Lightroom sampled from, and move the source if it picked up a different part of the backdrop. On wide areas this smudges and repeats, so keep it for small problems. Near hair it often pulls strands into the background, so stay away from the edge.
Step 4: Add Grain Back
A softened backdrop can look cleaner than the rest of the photo. A little Grain in the Effects panel ties it together. Grain applies to the whole photo, so keep it low. It also helps against banding on smooth backgrounds when you export a JPEG, which I explain in how to fix banding in Lightroom.
When to Send It to Photoshop
If you can still see the folds after these steps, press Cmd/Ctrl+E (Photo > Edit In > Edit in Adobe Photoshop). Photoshop gets your Lightroom edits, and when you save, the file comes back to your catalog next to the original. In Photoshop, a Median blur on a mask removes the folds properly. The full method, with the hair edge, is in how to remove wrinkles from a backdrop in Photoshop.
I make Backdrop Pro, so weigh that. It is the Photoshop route in one click: it builds the blur, texture and grain layers with a black mask, and you paint over the backdrop. It is a Photoshop plugin, so it does not run inside Lightroom. You send the photo over with Cmd/Ctrl+E, paint, save, and it comes back.
Lightroom vs Photoshop for Backdrops
| PROBLEM | LIGHTROOM | PHOTOSHOP |
|---|---|---|
| Soft folds in muslin | Often enough with a mask | Clean result with blur on a mask |
| Sharp creases in paper or vinyl | Softer, still visible | Gone with blur or Patch |
| One dent or footprint | Remove tool | Patch or Content-Aware Fill |
| Folds behind hair | Hard, mask edge shows | Careful mask, still slow |
The best fix is still the one on set: steam or hang the backdrop, light it from the front, and keep the person away from it. That is all in how to get wrinkles out of a backdrop. For wrinkled clothes in Lightroom, the same limits apply, see removing wrinkles from clothes in Lightroom.
Backdrop Pro: the backdrop wrinkle remover for Photoshop
One click builds the setup, then you paint over the backdrop. Wrinkles, creases and dust soften, grain is added back so the background does not band, and every slider stays adjustable.
GET BACKDROP PRO →Frequently Asked Questions
Can Lightroom remove wrinkles from a backdrop?
It can soften them. A background mask with negative Texture and Clarity, lifted Shadows and lowered Highlights flattens soft folds. Lightroom has no blur or layers, so deep creases stay visible and are easier to fix in Photoshop.
What settings smooth a backdrop in Lightroom?
Mask the background, then lower Texture strongly, lower Clarity, raise Shadows and lower Highlights. Add a little Grain afterwards so the backdrop matches the rest of the photo.
How do I send a photo from Lightroom to Photoshop?
Press Cmd/Ctrl+E or use Photo > Edit In > Edit in Adobe Photoshop. When you save in Photoshop, the edited file comes back into your Lightroom catalog.
Does the Remove tool work on backdrop wrinkles?
For single creases, dents and marks, yes. On large wrinkled areas it smudges and repeats texture, and near hair it can pull strands into the background.